Landscaping Guru

Start with the service type

Landscaping Services Guideposts

Use these guides to understand what each service includes before comparing providers or requesting quotes.

Core service explainers

Start here when you are still deciding what kind of landscaper or outdoor contractor you need.

Compare before you hire

Use these pages when two services or surface choices sound similar but lead to different scopes.

Hire smarter

Planning And Contractor Comparison

Use this hub when you are moving from ideas into estimates, bids, and contractor conversations.

Before requesting estimates

These guides help define scope and compare companies before the first site visit.

Budget with better assumptions

Cost Guides And Calculators

Use this hub to move from rough budget ranges into the details that usually change quotes.

Calculator starting points

Open the calculator hub or a cost guide when you need a quick planning range.

High-impact cost decisions

These pages help compare choices where price, lifespan, and maintenance tradeoffs matter.

Understand the build

Installation And Site-Work Pathways

Use these guides to understand sequencing, site prep, access, and the details that affect long-term performance.

Hardscape and site prep

These projects often depend on base prep, demolition, grading, drainage, and access.

Drainage and retaining work

Use these when water, grade, or slope stability is part of the project.

Choose materials with ownership in mind

Material And Finish Decision Paths

Use these guides when appearance, maintenance, replacement, and budget all affect the right material choice.

Surface and finish comparisons

Compare outdoor surfaces before committing to a driveway, patio, or lawn direction.

Landscape material planning

Use these pages when quantity, delivery, or long-term maintenance are the main concern.

Protect the investment

Maintenance And Ownership Next Steps

Use these guides to understand ongoing care, seasonal refreshes, and when maintenance points to a bigger fix.

Maintenance planning

These guides help compare recurring service, seasonal work, and refresh projects.

When upkeep becomes repair

Use these when repeated maintenance problems suggest drainage, surface, or material issues.

  • Why Concrete Driveways Crack and How Contractors Control It

    Why Concrete Driveways Crack and How Contractors Control It

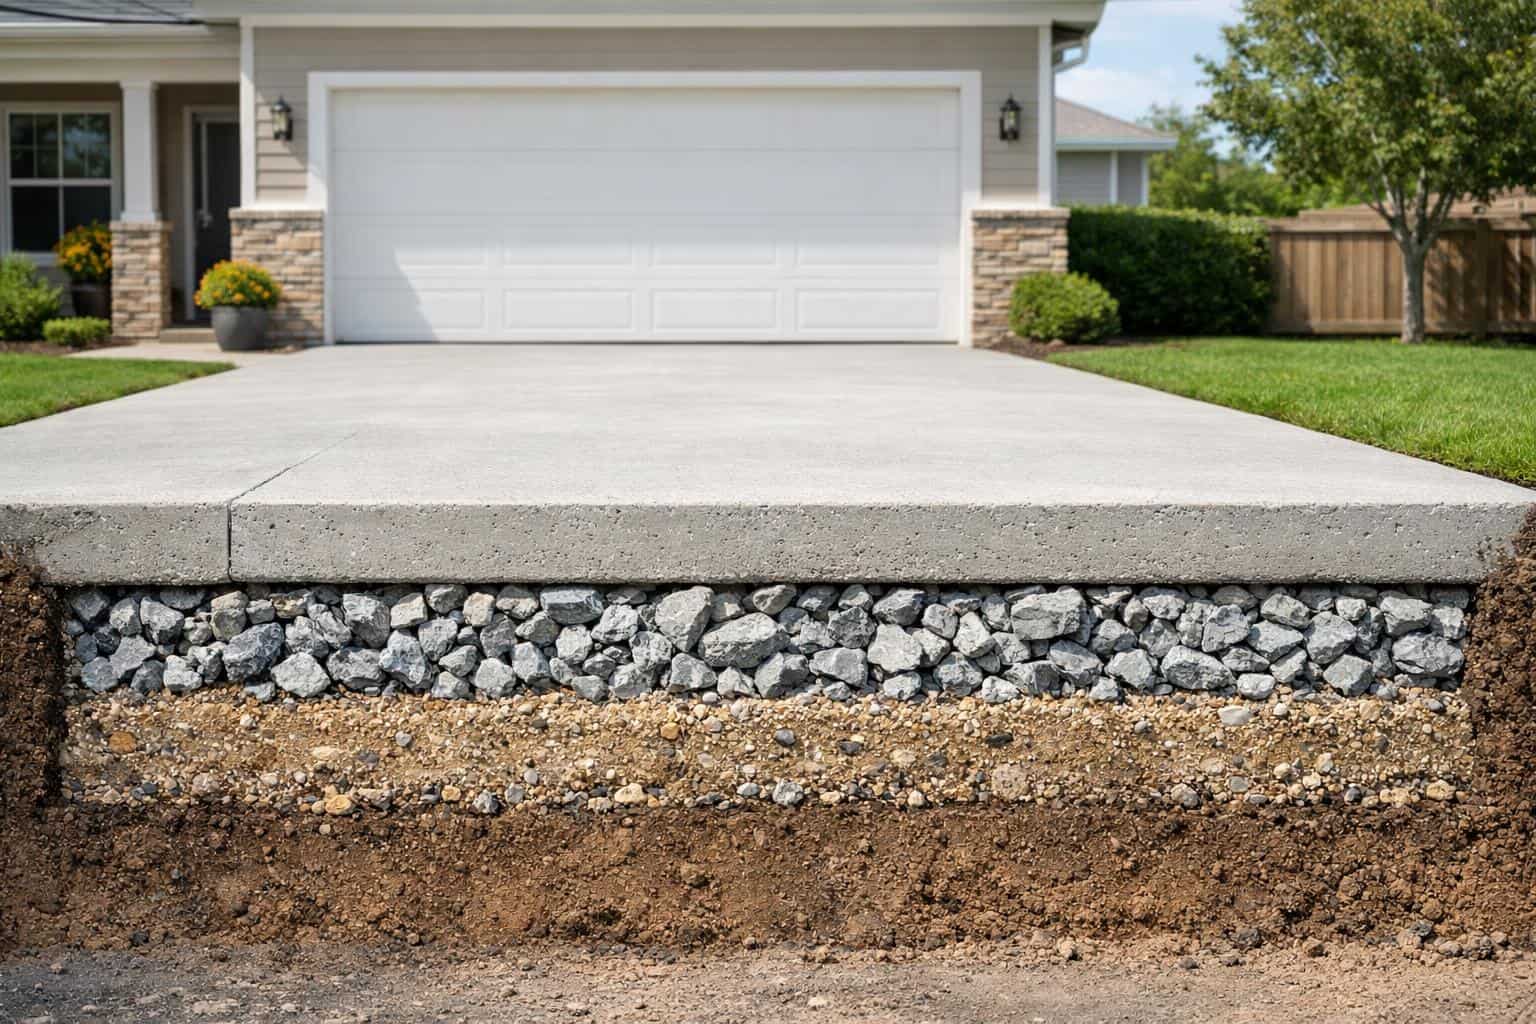
    Concrete cracking worries almost every homeowner, but cracking by itself is not proof that a driveway was installed badly. Concrete naturally shrinks as it cures, responds to temperature change, and moves slightly with the ground beneath it. The real question is not whether cracking can happen at all. The real question is whether the driveway was built to control that movement in a predictable way.

    Good contractors talk honestly about cracking because they understand the difference between expected movement and preventable damage. Homeowners should be cautious when someone promises a driveway that will never crack.

    Why concrete cracks in the first place

    • Moisture loss during curing causes shrinkage.
    • Temperature swings expand and contract the slab.
    • Soil movement can remove support beneath sections of concrete.
    • Heavy loads stress weak or thin areas.
    • Poor drainage softens the base and increases movement.

    Some of these forces are unavoidable. That is why installation quality matters so much. Contractors are not eliminating physics; they are managing it.

    Why Concrete Driveways Crack and How Contractors Control It related example showing Concrete, paver, and stone outdoor surfaces showing common patio and walkway material choices for homeowners
    This patio example gives homeowners a visual reference for comparing layout, materials, and maintenance tradeoffs before starting the project.

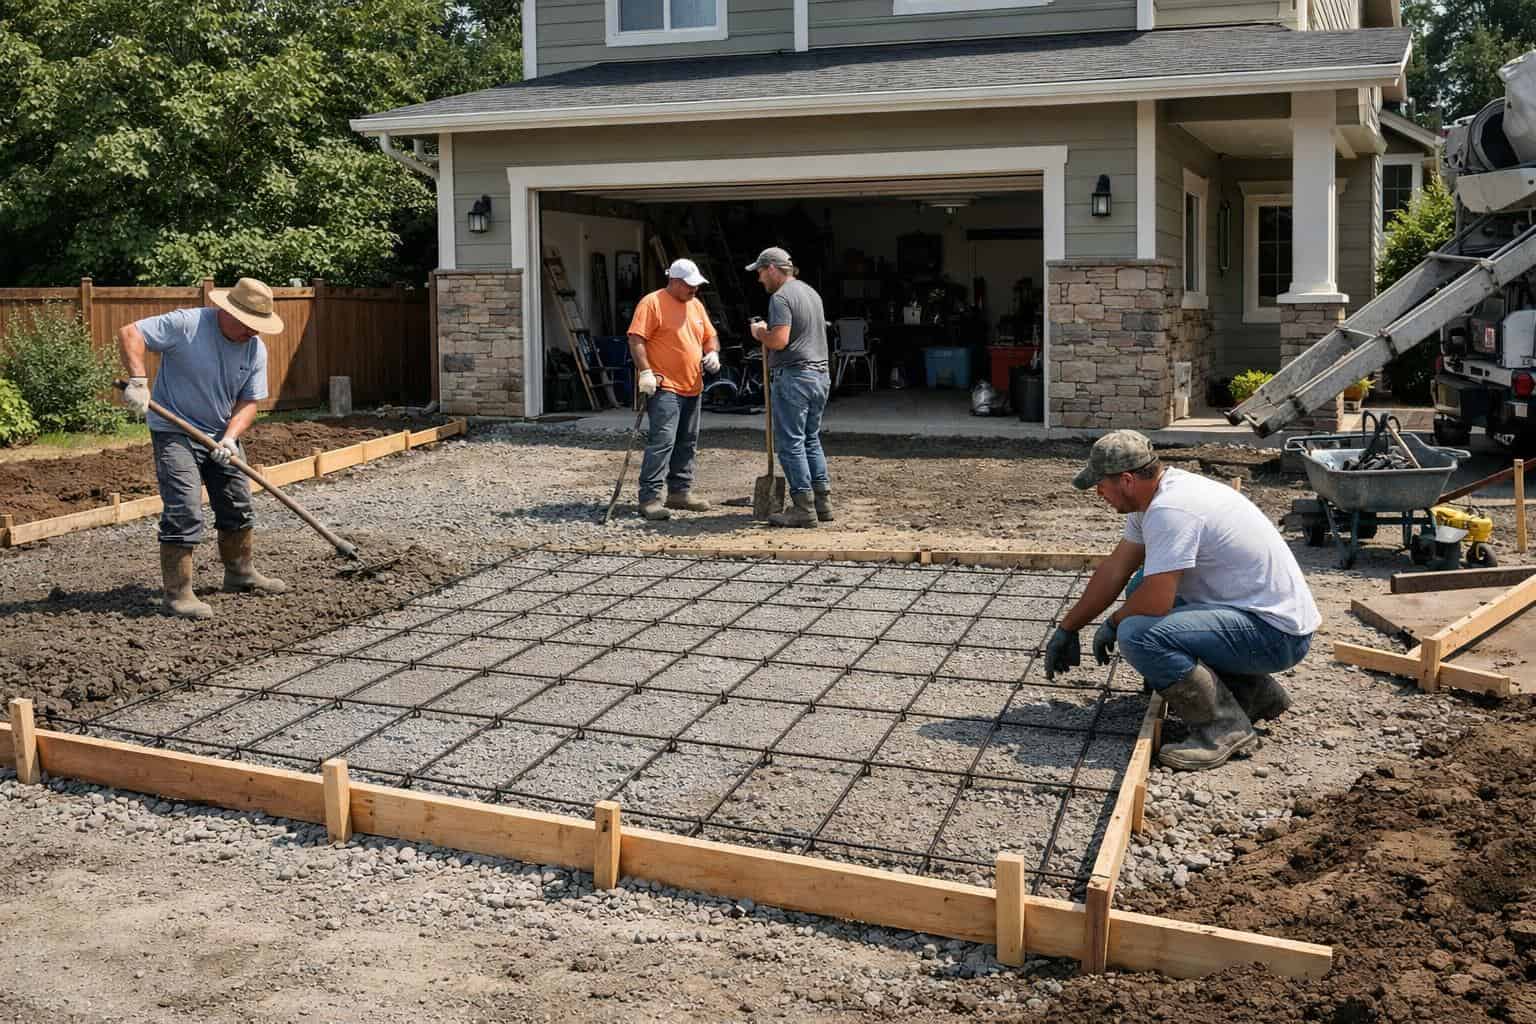
    How contractors control cracking

    Concrete driveway installation with joint planning and finishing methods that help contractors control cracking.
    Contractors control cracking through base prep, reinforcement decisions, joint planning, and how the slab is placed and cured.

    The most important crack-control steps happen before the concrete truck shows up. A stable base, consistent thickness, proper slope, and smart joint placement all help the slab behave the way it is supposed to.

    • Compact the subgrade and base so the slab has uniform support.
    • Pour the driveway at the right thickness for the expected traffic.
    • Place control joints so shrinkage cracks form where planned.
    • Maintain drainage so water does not undermine the slab.
    • Follow sound curing practices instead of rushing the finish.

    These are the kinds of details homeowners should ask about during the bidding stage. If a contractor glosses over them, that is useful information in itself.

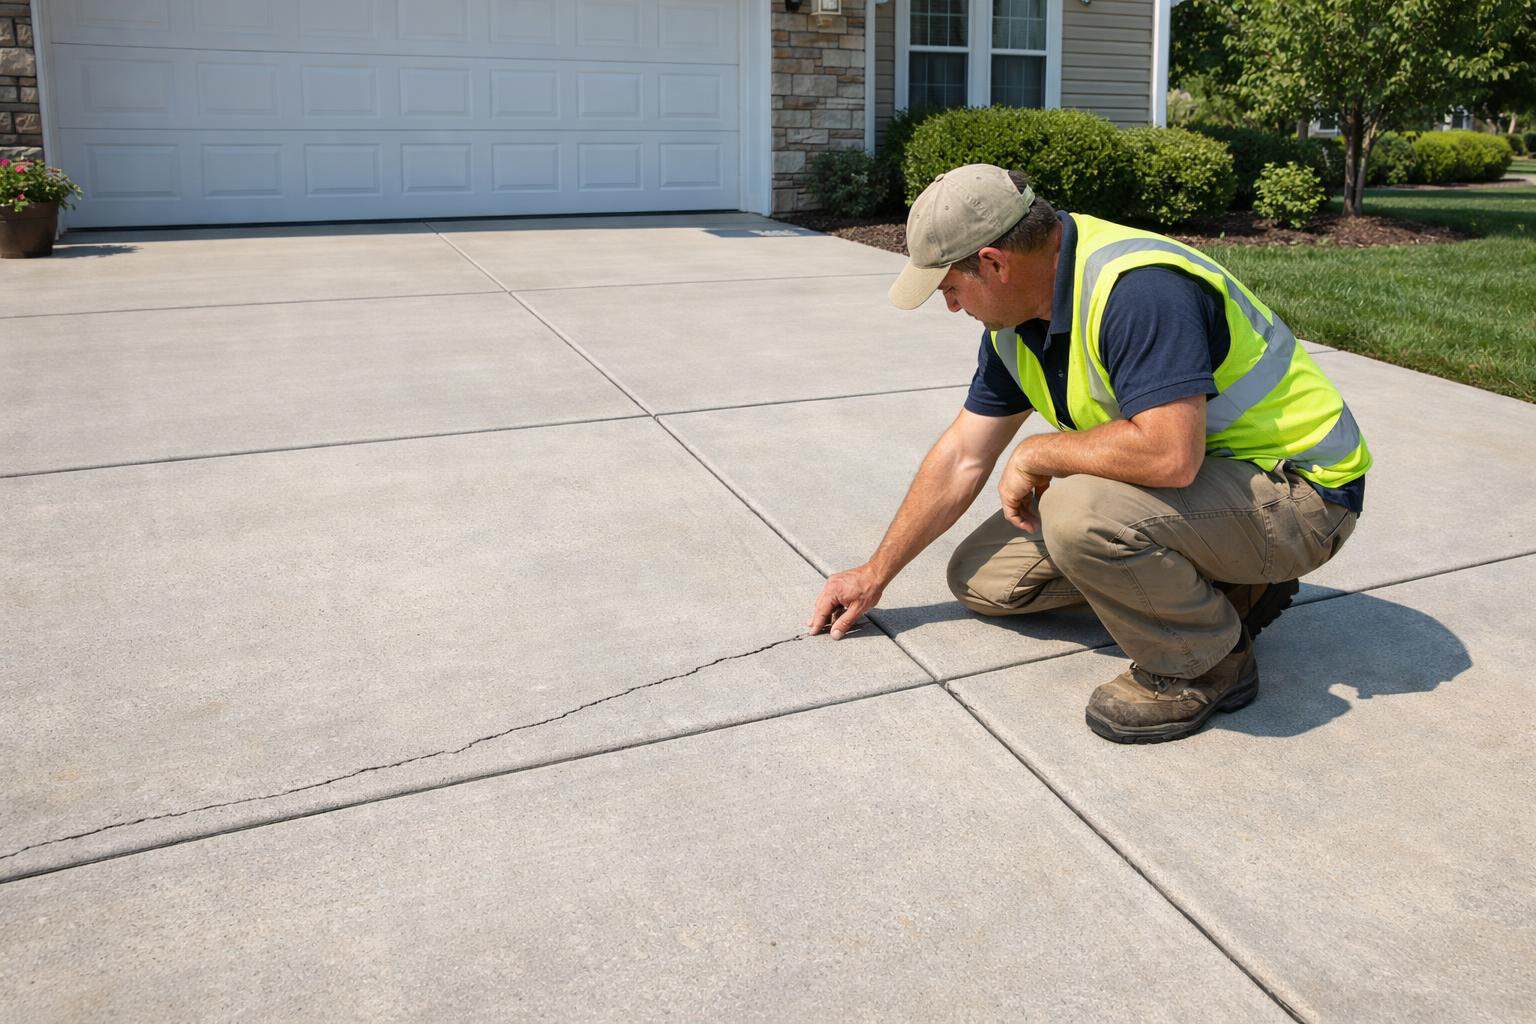
    What kinds of cracks are more concerning

    Fine shrinkage cracks and controlled movement at joints are very different from wide cracks, vertical displacement, or recurring cracks near settled areas. When one side of the crack is higher than the other, or the same area continues to break down, there may be a support or drainage problem under the slab.

    That is why it helps to look at crack pattern, location, and movement together instead of reacting to every visible line the same way.

    Questions homeowners should ask

    • How will you prepare and compact the base?
    • Where will control joints go and how will that layout be decided?
    • What thickness are you pouring for the vehicles that use this driveway?
    • How will runoff be directed away from the slab?
    • What cracking should be considered normal after installation?

    If you are evaluating a bid, those answers are often more important than a vague statement about workmanship. They reveal whether the contractor is planning for performance or just talking about appearance.

    Bottom line

    Concrete driveways can crack because concrete is a rigid material exposed to shrinkage, temperature change, and soil movement. What separates a durable installation from a disappointing one is how well the contractor controls those forces with preparation, thickness, joints, and drainage. For a broader look at build quality, pair this article with our guide to driveway thickness and the full installation process.

    Plan the Bigger Project

    Concrete work is often just one part of a broader exterior upgrade. If you are still mapping out the full project, also read our landscaping services guide, questions to ask before hiring a landscaper, what to expect during a landscaping project, and our landscaping costs guide for homeowners.


  • Broom Finish vs Stamped Concrete Driveways

    Broom Finish vs Stamped Concrete Driveways

    Driveway finish affects more than appearance. It changes traction, maintenance, cost, and how the concrete fits the style of the home. For many homeowners, the first real design decision is whether to choose a simple broom finish or spend more for a stamped surface.

    Neither option is automatically better. The right choice depends on how important low maintenance, decorative detail, budget control, and long-term upkeep are for the property.

    What a broom finish offers

    A broom finish is the classic textured driveway surface most homeowners recognize. After the concrete is placed and floated, the surface is brushed to create light traction lines. The result is clean, practical, and usually the most budget-friendly choice.

    Broom Finish vs Stamped Concrete Driveways related example showing Concrete, paver, and stone outdoor surfaces showing common patio and walkway material choices for homeowners
    This patio example gives homeowners a visual reference for comparing layout, materials, and maintenance tradeoffs before starting the project.
    • Good traction for everyday vehicle and foot traffic.
    • Simple appearance that suits many homes.
    • Lower installation cost than stamped decorative work.
    • Easier touch-ups and straightforward maintenance.

    For homeowners who care most about durability, function, and cost control, broom finish is often the easiest answer to justify.

    What stamped concrete adds

    Stamped concrete is chosen for style. It can mimic stone, pavers, slate, or other decorative looks while still being a poured slab. That makes it attractive for homeowners who want the driveway to contribute more strongly to curb appeal.

    • More decorative character and visual texture.
    • Better alignment with custom hardscape design goals.
    • Potential to tie together patios, walkways, and entry areas.

    The tradeoff is that stamped work is more detail-sensitive. Pattern, coloring, release products, and sealing all matter more than they do on a standard broom-finished driveway.

    Cost and maintenance differences

    Stamped concrete usually costs more because it requires more labor, tools, timing, and finishing control. Homeowners should also expect more ongoing attention if they want the decorative surface to keep its best appearance over time. Sealing is often more important on stamped work than on a basic broom finish.

    Broom Finish vs Stamped Concrete Driveways related example showing Backyard patio comparison showing paver surface and stamped concrete surface
    This related patio detail helps show how site conditions and finish choices can change the homeowner's plan.

    Broom finish is simpler to maintain and easier to evaluate from a functional standpoint. Stamped concrete can be worth the premium when appearance is a top priority, but it should be chosen with clear expectations about care and budget.

    Questions to ask before deciding

    • Is the driveway mainly a practical surface, or is it a major curb-appeal feature?
    • How important is slip resistance in the specific climate and location?
    • Does the budget allow for decorative work and future resealing?
    • Will the finish still suit the home several years from now?

    Bottom line

    Broom finish is usually the best choice for homeowners who want a proven, practical, lower-maintenance driveway. Stamped concrete is a design-forward option for homeowners willing to spend more for a more decorative result. If you are also comparing lifespan and upkeep, read our maintenance and sealing guide and our breakdown of driveway lifespan.

    Plan the Bigger Project

    Concrete work is often just one part of a broader exterior upgrade. If you are still mapping out the full project, also read our landscaping services guide, questions to ask before hiring a landscaper, what to expect during a landscaping project, and our landscaping costs guide for homeowners.


  • Concrete Driveway Thickness: What Homeowners Really Need

    Concrete Driveway Thickness: What Homeowners Really Need

    Concrete thickness is one of the most important structural decisions in a driveway project. It does not always get the same attention as finish, color, or price, but it has far more influence on how the slab handles vehicles and how long it stays serviceable.

    Homeowners should never assume thickness is a minor technical detail. If the driveway is poured too thin for the way it will be used, cracking, settling, and edge damage can show up much sooner than expected.

    Why thickness matters

    A driveway slab has to spread vehicle weight across the base below it. The thicker and better-supported the slab is, the better it can resist bending stress and everyday load. Thickness works together with base preparation and drainage, so it should be discussed as part of the overall structure, not as an isolated number.

    Concrete Driveway Thickness: What Homeowners Really Need related example showing Concrete, paver, and stone outdoor surfaces showing common patio and walkway material choices for homeowners
    This patio example gives homeowners a visual reference for comparing layout, materials, and maintenance tradeoffs before starting the project.
    • Thicker concrete generally handles stress better.
    • Edges are especially vulnerable when thickness is inadequate.
    • Heavy vehicles can expose a thin slab quickly.
    • Poor base preparation can make even a decent thickness perform badly.

    Residential use should drive the recommendation

    Most homeowners are not engineering a driveway from scratch, but they should still explain how the surface will be used. A driveway serving normal family vehicles may have different needs than one expected to handle heavier trucks, trailers, or repeated concentrated loads.

    That is why a trustworthy contractor asks about use patterns instead of quoting the same thickness to everyone. Matching the slab to the real traffic is part of good planning.

    Thickness is not enough without a proper base

    Homeowners sometimes hear thickness discussed as if it solves everything. It does not. Concrete still needs consistent support underneath. If the base is poorly compacted, wet, or uneven, the slab may crack or settle even when the thickness sounds acceptable on paper.

    When reviewing bids, ask not only how thick the driveway will be, but also what material will go underneath it, how the base will be compacted, and how runoff will be directed away from the slab.

    Questions homeowners should ask

    • What thickness are you recommending for this specific driveway and why?
    • How does that thickness account for heavier vehicles or edge loading?
    • What base material will support the slab?
    • How will drainage be handled so the slab keeps support over time?

    These questions help homeowners compare proposals on structural value rather than surface-level price alone.

    Concrete Driveway Thickness: What Homeowners Really Need related example showing Backyard patio comparison showing paver surface and stamped concrete surface
    This related patio detail helps show how site conditions and finish choices can change the homeowner's plan.

    Bottom line

    The right thickness is the thickness that matches how the driveway will actually be used and is supported by proper base preparation and drainage. Homeowners who want a durable slab should treat thickness as a core decision, not a fine-print detail. If you want to see how thickness fits into the broader process, read our step-by-step installation guide.

    Plan the Bigger Project

    Concrete work is often just one part of a broader exterior upgrade. If you are still mapping out the full project, also read our landscaping services guide, questions to ask before hiring a landscaper, what to expect during a landscaping project, and our landscaping costs guide for homeowners.


  • Concrete Driveway Installation Process Explained Step-by-Step

    Concrete Driveway Installation Process Explained Step-by-Step

    Most homeowners only see the day concrete gets poured, but the quality of a driveway is decided long before that. The strongest installations come from a process that starts with planning and base preparation, not from a rush to get gray concrete on the ground.

    Understanding the sequence helps homeowners compare bids and spot shortcuts. If a contractor skips over prep, drainage, or curing, that is usually more important than how polished the sales pitch sounds.

    1. Layout and planning

    The project begins with measurements, slope evaluation, access planning, and decisions about width, thickness, finish, and drainage. This is when contractors should identify any property-specific issues such as poor runoff, grade changes, root interference, or awkward garage transitions.

    Concrete Driveway Installation Process Explained Step-by-Step related example showing Front entry walkway with edging, planting beds, and material detail relevant to pathway cost planning
    This walkway example gives homeowners a visual reference for comparing layout, materials, and maintenance tradeoffs before starting the project.

    2. Demolition or excavation

    If an old driveway exists, it is removed and hauled away. For new work, the area is excavated to the required depth. The goal is to create room for both the base layer and the concrete slab, not just scrape the surface and pour on unstable ground.

    3. Base preparation

    This is one of the most important stages in the whole project. The base is shaped, leveled, and compacted so the concrete has consistent support. If the driveway will fail early, the cause is often here. Good prep also helps the contractor establish the right slope so water sheds away from the slab.

    4. Forms and thickness control

    Forms define the driveway shape and help maintain proper dimensions during the pour. Thickness decisions matter here too, especially around edges and areas that may see heavier loading. Homeowners should ask how the slab thickness was chosen for the way the driveway will actually be used.

    5. Reinforcement and joint planning

    Depending on the design, reinforcement may be used to help control movement and support the slab. Just as important, the contractor should plan control joints so shrinkage cracks form in predictable locations instead of wandering randomly across the surface.

    6. Pouring and placing the concrete

    Once the truck arrives, timing matters. The concrete must be placed, spread, and leveled efficiently so the crew can maintain consistency before finishing begins. This stage looks dramatic, but it only succeeds when the earlier prep work was handled correctly.

    7. Finishing the surface

    After screeding and floating, the contractor applies the chosen finish. On many residential driveways, that means a broom finish for traction. Decorative projects may involve other finishes or stamped patterns. The finish should match both the homeowner’s design priorities and the driveway’s functional needs.

    8. Cutting joints and protecting the slab

    Control joints are cut or formed to guide where shrinkage movement occurs. The slab then needs time to cure. This part often gets underestimated by homeowners eager to use the new surface quickly, but curing is part of the installation, not an afterthought.

    9. Final walkthrough and homeowner expectations

    Before the job is considered complete, the contractor should explain when the driveway can be walked on, driven on, cleaned, or sealed. This is also the right time to ask what cracking is considered normal and what warning signs would justify follow-up.

    What homeowners should watch for

    • Does the contractor emphasize prep and drainage, or only talk about the pour day?
    • Are thickness and joint placement explained clearly?
    • Is curing time treated seriously?
    • Are expectations for traffic and maintenance explained before the project starts?

    A quality driveway is a sequence of correct steps, not a single dramatic moment. If you are still comparing bids, pair this article with our contractor selection guide and our article on crack control.

    Concrete Driveway Installation Process Explained Step-by-Step related example showing Residential walkway and pathway installation scene with pavers, edging, and landscape bed context
    This related walkway detail helps show how site conditions and finish choices can change the homeowner's plan.

    Plan the Bigger Project

    Concrete work is often just one part of a broader exterior upgrade. If you are still mapping out the full project, also read our landscaping services guide, questions to ask before hiring a landscaper, what to expect during a landscaping project, and our landscaping costs guide for homeowners.

    If you are still deciding on surface type before the project starts, compare the tradeoffs in our concrete vs paver driveway guide.

    More Concrete Driveway Installation Process Explained Step-by-Step Guides

    More Driveway Finish and Edge Guides


  • Choosing the Right Contractor for a Concrete Driveway

    Choosing the Right Contractor for a Concrete Driveway

    Image

    A concrete driveway is not a small cosmetic upgrade. It is a permanent, load-bearing structure that affects curb appeal, drainage, daily use, and property value. Homeowners often underestimate how many decisions—and risks—are involved before concrete is even poured.

    This guide walks through how a typical homeowner should approach hiring a contractor for a concrete driveway, what to look for, what services to expect, design considerations, and how to avoid costly mistakes. It is written as a one-stop reference and intended to serve as pillar content, with clear opportunities to branch into supporting articles.


    Step 1: Defining the Project Before Calling Contractors

    Before contacting any contractor, homeowners should have a rough idea of what they want. This does not require technical knowledge, but clarity helps avoid vague quotes and change orders later.

    Key questions to answer upfront:

    • Is this a replacement or a brand-new driveway?
    • Will the driveway be standard broom finish, decorative, or exposed?
    • Are there drainage issues, slope concerns, or pooling water?
    • Will it support heavy vehicles (trucks, RVs, trailers)?
    • Are permits likely required in the city or county?

    Even simple answers help contractors provide realistic proposals instead of guesswork pricing.


    Step 2: Finding and Shortlisting Contractors

    Most homeowners start with:

    • Google search
    • Google Maps listings
    • Referrals from neighbors
    • Local contractor websites

    At this stage, quantity matters less than quality. Narrow the list to 3–5 contractors that specialize in concrete flatwork, not general “handyman” services.

    Red flag early on

    If a contractor:

    • Cannot clearly explain their concrete process
    • Avoids written estimates
    • Pushes for cash only
    • Cannot show recent driveway work

    Move on.


    Step 3: Verifying License, Bond, and Insurance (Non-Negotiable)

    This is where many homeowners cut corners—and regret it later.

    What to verify

    • Contractor license
      Confirms the contractor is legally allowed to perform concrete work in your state.
    • Bond
      Protects the homeowner if the contractor fails to complete the job or violates contract terms.
    • General liability insurance
      Covers damage to property, utilities, or neighboring structures.
    • Workers’ compensation insurance
      Prevents homeowner liability if a worker is injured on site.

    A legitimate contractor will provide this information without hesitation. If they resist, that is your answer.


    Step 4: Understanding What Services a Concrete Driveway Contractor Should Provide

    A professional driveway contractor does more than “pour concrete.”

    Core services you should expect

    • Site evaluation and measurement
    • Removal of existing driveway (if applicable)
    • Proper subgrade preparation and compaction
    • Base material installation (gravel or crushed rock)
    • Forming and edge control
    • Reinforcement (rebar or wire mesh where appropriate)
    • Concrete placement and finishing
    • Control joints or saw-cut joints
    • Cleanup and disposal
    • Final walkthrough

    If these steps are not clearly explained in the estimate, the contractor may be cutting corners.


    Step 5: Subgrade and Base Preparation — The Most Ignored Step

    Concrete does not fail because it is weak. It fails because what is under it was done poorly.

    A quality contractor will:

    • Excavate to proper depth
    • Compact native soil
    • Install and compact base material in lifts
    • Address soft spots or expansive soils
    • Plan drainage flow away from the slab

    Homeowners should ask directly:

    “How do you prepare the base before pouring concrete?”

    If the answer is vague, be cautious.


    Step 6: Concrete Thickness, Reinforcement, and Load Expectations

    Not all driveways are equal.

    Key considerations:

    • Typical residential thickness: 4 inches
    • Heavy vehicle or commercial use: 5–6 inches
    • Reinforcement options:
      • Rebar
      • Wire mesh
      • Fiber-reinforced concrete (supplemental, not a replacement)

    A good contractor explains why they recommend a certain thickness or reinforcement—not just what they use by default.


    Step 7: Driveway Design Options (Functional First, Decorative Second)

    Most homeowners think design means stamped concrete. In reality, design starts with layout.

    Choosing the Right Contractor for a Concrete Driveway related example showing Concrete, paver, and stone outdoor surfaces showing common patio and walkway material choices for homeowners
    This patio example gives homeowners a visual reference for comparing layout, materials, and maintenance tradeoffs before starting the project.

    Functional design decisions

    • Driveway width and turning radius
    • Approach slope to garage
    • Drainage channels or swales
    • Walkway integration
    • RV or side parking pads

    Finish and aesthetic options

    • Broom finish (most common and practical)
    • Light texture or salt finish
    • Colored concrete
    • Stamped or decorative borders
    • Exposed aggregate

    A responsible contractor will explain maintenance, slip resistance, and long-term durability—not just appearance.


    Step 8: Permits, Inspections, and Local Codes

    Many municipalities require permits for:

    • Driveway replacements
    • Curb cuts
    • Drainage modifications
    • Public sidewalk tie-ins

    Homeowners should clarify:

    • Who pulls the permit?
    • Are inspections required?
    • Are city fees included in the estimate?

    If a contractor suggests skipping permits “to save time,” that is a liability risk for the homeowner.


    Step 9: Timeline, Scheduling, and Weather Realities

    Concrete is weather-sensitive.

    A realistic contractor will:

    • Provide a general timeline (not rigid promises)
    • Schedule pours based on temperature and conditions
    • Explain curing time and access restrictions
    • Provide guidance on when vehicles can return

    Expect transparency, not guarantees that ignore weather.


    Step 10: Warranty, Maintenance, and What Comes After the Pour

    Concrete is durable, but not maintenance-free.

    Ask about:

    • Workmanship warranty
    • Crack expectations (concrete cracks—control is the goal)
    • Sealing recommendations
    • Cleaning and care instructions

    A professional contractor educates homeowners on long-term care instead of overselling “crack-proof” claims.


    Common Mistakes Homeowners Make

    • Choosing the lowest bid without understanding scope
    • Ignoring base preparation details
    • Not verifying license and insurance
    • Focusing only on finish, not structure
    • Allowing rushed pours without proper prep

    A driveway should last decades. Cutting corners upfront shortens that lifespan dramatically.


    Final Thoughts: Choosing Confidence Over Convenience

    Hiring a concrete driveway contractor is not about speed or price alone. It is about choosing a professional who understands structure, drainage, code compliance, and long-term performance.

    Homeowners who ask the right questions, verify credentials, and understand the process end up with a driveway that performs as well as it looks.


    SEO-Ready Supporting Articles (Internal Linking Opportunities)

    This pillar page can link to deeper supporting content, such as:

    • “Concrete Driveway Installation Process Explained Step-by-Step”
    • “Concrete Driveway Thickness: What Homeowners Really Need”
    • “Broom Finish vs Stamped Concrete Driveways”
    • “Why Concrete Driveways Crack and How Contractors Control It”
    • “How Long Does a Concrete Driveway Last?”
    • “Concrete Driveway Maintenance and Sealing Guide”
    • “Replacing an Old Driveway vs Pouring New Concrete”

    Plan the Bigger Project

    Concrete work is often just one part of a broader exterior upgrade. If you are still mapping out the full project, also read our landscaping services guide, questions to ask before hiring a landscaper, what to expect during a landscaping project, and our landscaping costs guide for homeowners.