Costs and Expectations

Cost and expectation guides focused on budgeting, lifespan, replacement decisions, and the real factors that shape landscaping quotes.

Start with the service type

Landscaping Services Guideposts

Use these guides to understand what each service includes before comparing providers or requesting quotes.

Core service explainers

Start here when you are still deciding what kind of landscaper or outdoor contractor you need.

Compare before you hire

Use these pages when two services or surface choices sound similar but lead to different scopes.

Hire smarter

Planning And Contractor Comparison

Use this hub when you are moving from ideas into estimates, bids, and contractor conversations.

Before requesting estimates

These guides help define scope and compare companies before the first site visit.

Budget with better assumptions

Cost Guides And Calculators

Use this hub to move from rough budget ranges into the details that usually change quotes.

Calculator starting points

Open the calculator hub or a cost guide when you need a quick planning range.

High-impact cost decisions

These pages help compare choices where price, lifespan, and maintenance tradeoffs matter.

Understand the build

Installation And Site-Work Pathways

Use these guides to understand sequencing, site prep, access, and the details that affect long-term performance.

Hardscape and site prep

These projects often depend on base prep, demolition, grading, drainage, and access.

Drainage and retaining work

Use these when water, grade, or slope stability is part of the project.

Choose materials with ownership in mind

Material And Finish Decision Paths

Use these guides when appearance, maintenance, replacement, and budget all affect the right material choice.

Surface and finish comparisons

Compare outdoor surfaces before committing to a driveway, patio, or lawn direction.

Landscape material planning

Use these pages when quantity, delivery, or long-term maintenance are the main concern.

Protect the investment

Maintenance And Ownership Next Steps

Use these guides to understand ongoing care, seasonal refreshes, and when maintenance points to a bigger fix.

Maintenance planning

These guides help compare recurring service, seasonal work, and refresh projects.

When upkeep becomes repair

Use these when repeated maintenance problems suggest drainage, surface, or material issues.

  • Do You Need a Permit for Landscaping Projects Guide

    Do You Need a Permit for Landscaping Projects Guide

    Some landscaping projects move forward with little paperwork, while others may require permits, inspections, engineering review, or homeowner-association approval. The difficult part for many homeowners is that the line between those two categories is not always obvious. A simple planting refresh usually does not raise permit questions. A project involving retaining walls, drainage changes, grading, utility work, outdoor kitchens, or structural features often might.

    The safest mindset is to treat permits as an early planning question instead of a last-minute obstacle. Even when the contractor will handle the paperwork, homeowners should still understand whether approvals may affect budget, timing, and scope.

    Projects that may trigger permit questions

    Permit requirements vary by jurisdiction, but some landscaping projects are more likely than others to need review. Walls above certain heights, drainage changes that alter runoff patterns, gas or electrical work, outdoor kitchens, structures, and major grading often deserve closer attention. Projects near property lines, easements, or utilities may also need more care.

    Do You Need a Permit for Landscaping Projects Guide related example showing Landscape beds and groundcover materials relevant to homeowner quantity planning for mulch, soil, and decorative rock
    This materials example gives homeowners a visual reference for comparing layout, materials, and maintenance tradeoffs before starting the project.

    That does not mean every version of these projects requires a permit, but it does mean homeowners should ask early rather than assume. The outdoor kitchen guide, retaining wall guide, and grading guide all involve project types where approvals may matter.

    Why approvals affect more than paperwork

    Permits and approvals can change project timing, contractor scheduling, and even design decisions. If engineering, inspections, or revised plans are required, the job may need more lead time than a homeowner expected. HOA review can also shape material choices, wall locations, fence-adjacent planting, or visible front-yard features.

    Do You Need a Permit for Landscaping Projects Guide related example showing Landscape beds and groundcover materials relevant to homeowner quantity planning for mulch, soil, and decorative rock
    This related materials detail helps show how site conditions and finish choices can change the homeowner's plan.

    That is why permit questions should be part of quote conversations. If one contractor has accounted for approval steps and another has not, the estimates may look different for reasons that are not obvious in the total number.

    Questions homeowners should ask early

    • Could this project trigger city, county, or HOA approval?
    • Who is responsible for checking permit requirements and handling submissions?
    • If engineering or inspection is required, is that included in the proposal?
    • Could approvals change the projected start date?
    • Are there property-line, drainage, or utility issues that affect design?

    The goal is not to become a permit expert. It is to make sure approval risk is surfaced before the project becomes urgent. Homeowners who ask early usually avoid better avoid preventable schedule surprises later.
    More Planning and Decision Guides


  • Best Time of Year to Start a Landscaping Project Guide

    Best Time of Year to Start a Landscaping Project Guide

    The best time to start a landscaping project depends on more than the calendar. Weather matters, but so do contractor availability, planting windows, material lead times, and how much planning the yard needs before work begins. Many homeowners wait until they want the finished result immediately, which often means they are starting the conversation later than ideal.

    In practice, the best season to build and the best season to plan are often not the same. Homeowners who understand that difference usually get smoother scheduling and better choices.

    Why planning should start earlier than construction

    One of the biggest timing mistakes is treating planning and construction as if they start at the same moment. If you want a patio, drainage work, planting, irrigation, or outdoor living area finished by peak-use season, it often helps to begin quote comparisons and design decisions earlier than expected. That gives you more room to compare contractors, phase the work, and avoid rushed decisions.

    The quote comparison guide is especially useful during this phase because it helps turn early estimates into a real decision process.

    How weather affects different kinds of work

    Not every project responds to weather the same way. Hardscape work like patios, retaining walls, and outdoor kitchens can be affected by rain, freeze cycles, soil conditions, or extreme heat. Planting projects depend on establishment conditions and irrigation support. Lawn work can be highly sensitive to seasonal timing, especially if sod or seed is involved.

    That means the “best” start time for a fire pit is not always the same as the best start time for a privacy hedge or lawn installation. The type of project should drive the timing conversation.

    Busy-season scheduling and contractor availability

    Popular landscaping seasons often come with tighter contractor schedules. Homeowners who contact contractors only when they want work to begin immediately may find that the best-fit crews are already booked. Starting earlier can improve both availability and decision quality, even if construction happens later.

    This is also why it helps to define scope before the calendar becomes urgent. The more clearly you understand your project, the easier it is to compare schedules realistically.

    Planting windows and long-term success

    Residential landscape phased around seasonal timing so planting and construction support long-term success.
    Seasonal timing matters because planting, grading, and installation windows can change how well the finished project establishes.

    Planting work adds another layer because the easiest time to install is not always the easiest time to establish. Trees, shrubs, privacy screening, and lawn areas all benefit from timing that supports root development and manageable watering. If planting is part of the project, it should be coordinated with irrigation and maintenance expectations from the beginning.

    Best Time of Year to Start a Landscaping Project Guide related example showing Low-water landscape bed materials including rock and mulch relevant to drought-conscious groundcover selection
    This materials example gives homeowners a visual reference for comparing layout, materials, and maintenance tradeoffs before starting the project.

    Homeowners planning broader yard changes may want to pair this guide with the front yard landscaping guide or backyard planning guide once those decisions move from timing into layout.

    How to choose the right start window

    • Start planning earlier than the season when you want the project finished.
    • Match timing to the kind of work, not just general landscaping advice.
    • Ask contractors how weather, access, and material lead times affect your specific yard.
    • Coordinate planting windows with irrigation, maintenance, and follow-up care.

    The best time to start a landscaping project is usually the point when you can still make good decisions without rushing. For most homeowners, that means beginning the process before the yard feels urgent.

    Seasonal guide: Timing decisions feel clearer when paired with the Fall Landscaping Checklist and Winter Yard Planning Guide.


  • How to Compare Landscaping Quotes Guide for Homeowners

    How to Compare Landscaping Quotes Guide for Homeowners

    Comparing landscaping quotes is one of the most important steps in a residential project, and it is also where many homeowners make avoidable mistakes. A low number can look appealing until the work begins and missing items start appearing as add-ons. A higher number can look expensive until you realize it includes better prep, cleaner scope, stronger materials, and a more realistic timeline. The goal is not to find the cheapest quote. It is to understand what each quote is actually promising.

    The best comparisons happen when homeowners review scope, assumptions, and contractor communication together. Price matters, but it only becomes useful when you know what is included and what has been left out.

    Start with scope, not price

    Before comparing totals, look at what each contractor is actually doing. One proposal may include demolition, haul-off, base preparation, drainage correction, finish grading, and cleanup. Another may price only the visible installation. If you compare only the headline number, you can end up rewarding the thinner quote instead of the better plan.

    This is especially important on projects that combine several parts of the yard. A patio, retaining wall, planting plan, and lighting package can be priced very differently depending on whether they are treated as one integrated project or several smaller tasks.

    Look for allowances, exclusions, and vague language

    Homeowners should pay close attention to terms like allowance, as needed, by owner, or to be determined. These are not automatically bad, but they usually signal uncertainty. If a quote uses a lot of vague language, ask what assumptions were made about materials, access, drainage, utilities, or site conditions.

    How to Compare Landscaping Quotes Guide for Homeowners related example showing Landscape beds and groundcover materials relevant to homeowner quantity planning for mulch, soil, and decorative rock
    This materials example gives homeowners a visual reference for comparing layout, materials, and maintenance tradeoffs before starting the project.

    Exclusions matter just as much as inclusions. If permits, irrigation adjustments, finish grading, or material disposal are not listed, find out whether they are intentionally excluded or just not addressed yet.

    Compare materials and installation method

    Two quotes can describe the same finished feature while using very different methods underneath. One retaining wall bid may include drainage stone, reinforcement, and proper excavation. Another may not. One patio proposal may clearly specify base depth, edge restraint, and finish detail. Another may stay vague. Material quality and install method often shape long-term performance more than the visible design.

    When you are not sure what the right construction standard looks like, reviewing related guides like the patio installation guide or retaining wall guide can make quote language easier to understand.

    Payment schedule and timeline matter too

    Landscaping planning meeting focused on contract questions, scheduling, and what a proposal really includes.
    Payment structure and timeline details often tell homeowners as much about a quote as the total dollar amount.

    A strong quote should also make it clear how payments are structured and what the rough timeline looks like. Homeowners should understand what starts the project, what progress milestones trigger payment, and what could cause timing to shift. A rushed timeline can be unrealistic. A vague timeline can create frustration later.

    The what to expect during a landscaping project guide is a good companion here because it helps set realistic expectations around phases and disruption.

    Questions to ask before choosing a quote

    • What assumptions were made about site prep, drainage, and access?
    • Which materials are included, and which are allowances?
    • What parts of the work are explicitly excluded?
    • How is cleanup, haul-off, and final finish work handled?
    • What could change the final cost after the job starts?

    Homeowners usually make better decisions when they compare quotes slowly and line by line. The clearest proposal is not always the lowest one, but it is often the one that leads to fewer surprises and a better project experience.

    Related guide: Permits, approvals, and engineering assumptions can change how quotes should be compared. The Do You Need a Permit for Landscaping Projects Guide helps surface that part of the conversation early.


  • Paver Patio vs Stamped Concrete Patio Guide for Homeowners

    Paver Patio vs Stamped Concrete Patio Guide for Homeowners

    Paver patios and stamped concrete patios can both create attractive outdoor living space, but they perform differently over time. Homeowners usually compare them on appearance first, yet the more useful questions are about maintenance, repair, movement, drainage, and how the surface fits the style of the yard.

    Because patios often become the center of backyard use, the material decision has an outsized effect on long-term satisfaction. It is worth slowing down here before choosing a finish based only on a sample board.

    Why homeowners choose pavers

    Pavers are popular because they offer strong visual flexibility and can be easier to repair in sections if an area settles or needs adjustment. They can work in classic, rustic, or more modern landscapes depending on the pattern and material selected. For homeowners who value detail and repairability, pavers often feel like the safer long-term choice.

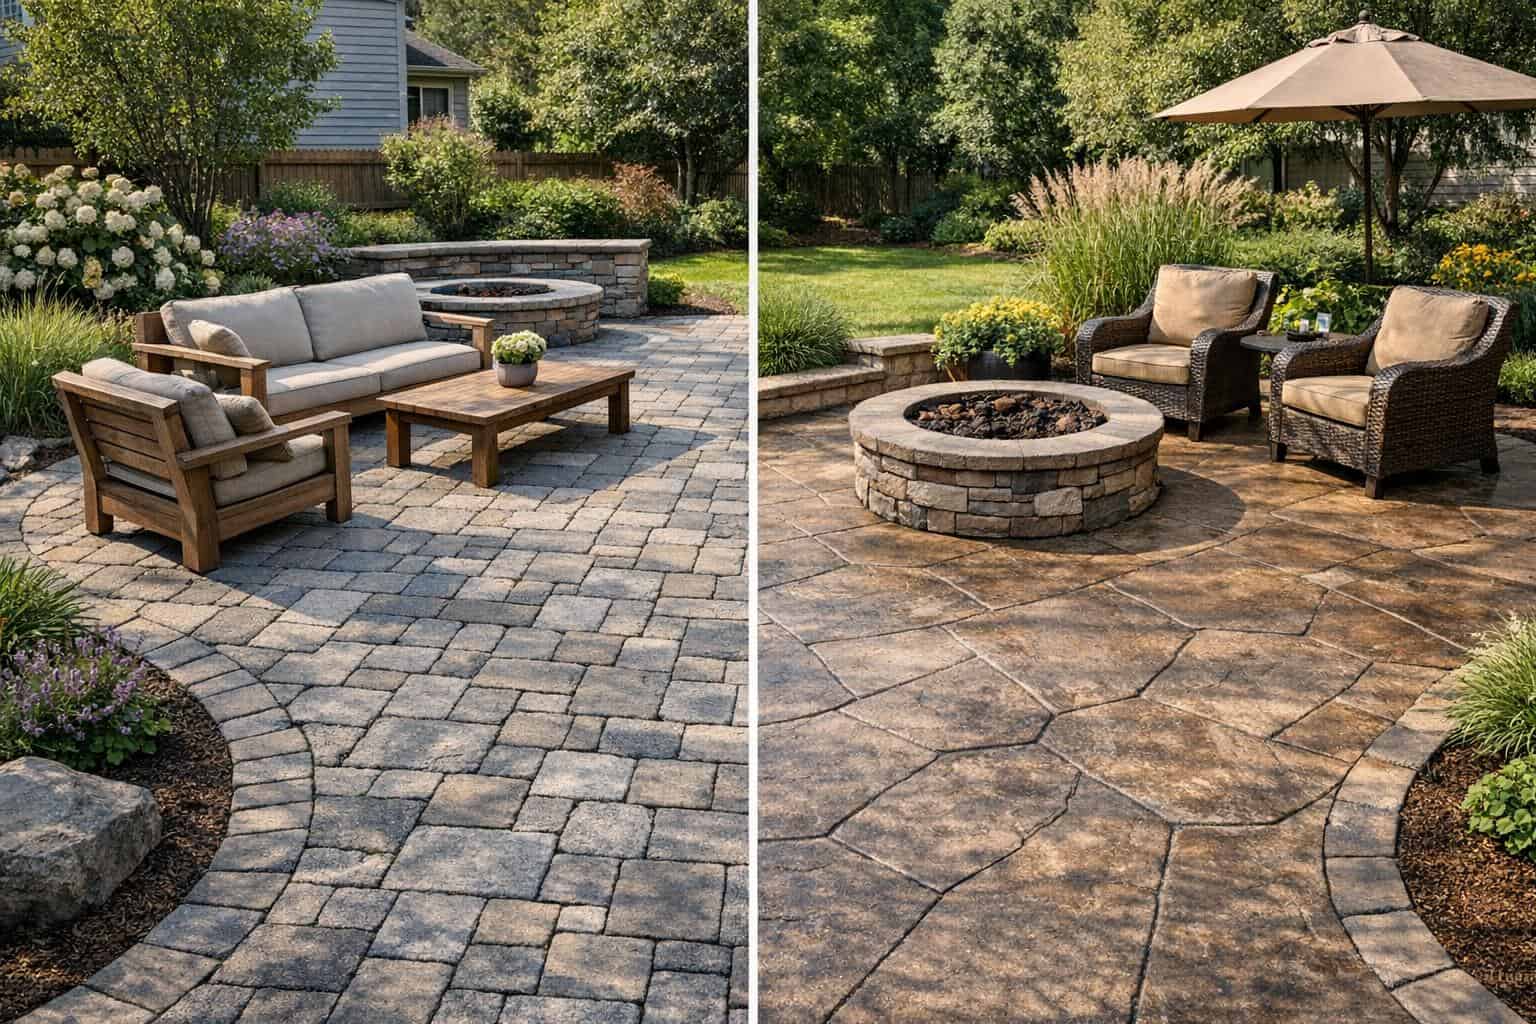
    Paver Patio vs Stamped Concrete Patio Guide for Homeowners related example showing Concrete, paver, and stone outdoor surfaces showing common patio and walkway material choices for homeowners
    This patio example gives homeowners a visual reference for comparing layout, materials, and maintenance tradeoffs before starting the project.

    The full construction side is covered in the patio installation guide, which explains why base prep and drainage matter no matter which finish is chosen.

    Why stamped concrete appeals to some homeowners

    Stamped concrete can create a broad, unified surface with decorative pattern and color. Some homeowners like the cleaner continuous look, and in the right design it can feel sleek and cost-effective. It can also suit spaces where fewer joints are visually preferred.

    The tradeoff is that repairs and cracking behavior are different from pavers. If issues develop, the fix may be less seamless than replacing individual units in a paver system.

    Maintenance and repair differences

    Paver patios may need occasional re-leveling, joint maintenance, or weed attention depending on the system and environment. Stamped concrete may need sealing and can show wear or cracking differently over time. Neither option is maintenance-free, but the type of maintenance is not the same.

    Appearance and design fit

    Pavers usually offer more texture and pattern variation. Stamped concrete can create a more continuous field with decorative imprint. The best fit depends on the house style, surrounding planting, and whether the patio connects to retaining walls, walkways, or other hardscape. If you are also deciding between outdoor gathering formats, the patio vs deck guide is worth comparing too.

    Cost and site conditions

    Cost depends on pattern choice, site prep, access, drainage needs, border detail, and installation complexity. Homeowners should compare complete scope rather than headline material price. A less expensive surface can still be the wrong choice if the site is more prone to movement or if repairability matters later.

    Paver Patio vs Stamped Concrete Patio Guide for Homeowners related example showing Paver patio surface with color and finish detail relevant to homeowner material-selection decisions
    This related patio detail helps show how site conditions and finish choices can change the homeowner's plan.

    The best patio choice is the one that fits the whole yard plan, not just the showroom sample. Homeowners who compare base prep, maintenance expectations, and style together usually make the most durable decision.

    Materials guide: Homeowners comparing finishes can also review the Patio and Walkway Materials Guide for a broader surface-choice breakdown.

    More Decision and Planning Guides


  • Sod vs Seed Guide for Homeowners

    Sod vs Seed Guide for Homeowners

    Sod and seed can both create a healthy lawn, but they ask different things from a homeowner. Some households want a faster finished look and are willing to invest more upfront. Others are comfortable with a longer establishment process if it helps control cost. The better choice depends on budget, timing, watering discipline, yard conditions, and how quickly the space needs to be usable.

    This is especially important on new builds or major yard renovations where irrigation, grading, and drainage may all affect lawn success.

    Why homeowners choose sod

    Sod gives a lawn an immediate finished appearance, which is one of its biggest advantages. It can make a newly built or renovated yard feel complete much faster than seed. In many cases it also helps control surface soil movement while the lawn establishes, which can be useful after grading work.

    That faster visual result is why sod often pairs well with the broader sod and lawn installation guide for homeowners who want a quick transformation.

    Why some homeowners prefer seed

    Seed can cost less upfront and may make sense when the project area is large, the budget is tighter, or the timeline is flexible. It can also be a reasonable path when homeowners are prepared to follow watering and establishment requirements carefully. The tradeoff is that the lawn takes longer to fill in, and results can be more sensitive to weather and care during the early stages.

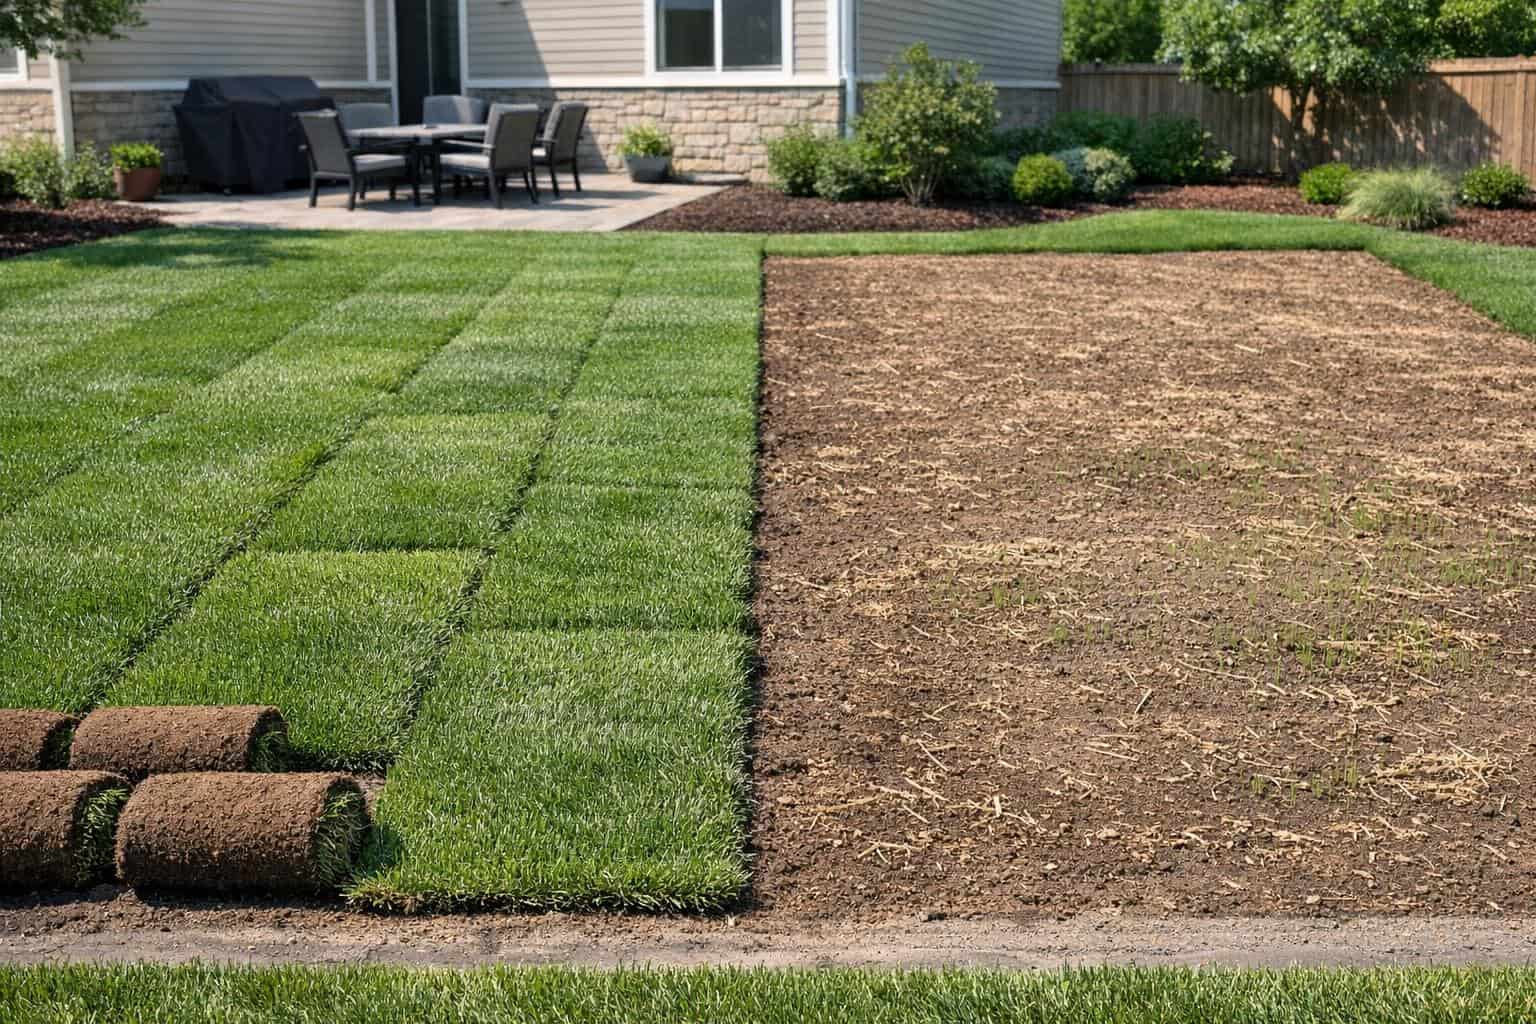
    Sod vs Seed Guide for Homeowners related example showing Lawn detail relevant to thinning, irrigation stress, and warning signs
    This lawn example gives homeowners a visual reference for comparing layout, materials, and maintenance tradeoffs before starting the project.

    Watering and establishment differences

    Both sod and seed need attentive watering early on, but the pattern and risk are different. Sod needs moisture to root in successfully, while seed needs the surface conditions to stay supportive long enough for germination and young growth. In either case, poor irrigation planning can undercut the result. That is why lawn-installation decisions often connect directly to the irrigation system guide.

    Durability, timing, and use

    If the yard needs to look finished sooner or handle activity earlier, sod is often the stronger fit. Seed usually requires more patience before the lawn looks complete and more caution before heavy use. Timing within the season also matters, since weather can help or hurt establishment.

    Cost tradeoffs

    Sod usually costs more upfront because homeowners are paying for a ready-grown product plus installation. Seed may lower initial cost, but it can demand more time, follow-up attention, and sometimes patching if establishment is uneven. The most useful cost comparison is not just material price, but the level of risk and time each path carries in your yard.

    Sod vs Seed Guide for Homeowners related example showing Lawn detail relevant to planning mistakes, prep, and irrigation decisions
    This related lawn detail helps show how site conditions and finish choices can change the homeowner's plan.

    Homeowners should also compare this decision with the broader artificial turf vs natural grass guide if they are still deciding whether a natural lawn is the right long-term direction in the first place.

    More Comparison and Decision Guides

    Compare sod, seed, and hydroseed ranges

    Use this calculator to compare rough lawn establishment ranges for the same area before choosing between faster results, lower upfront cost, and watering requirements.

    Sod vs Seed Cost Calculator

    Compare rough installed cost ranges for sod, seed, and hydroseed on the same lawn area.


  • Mulch vs Rock Landscaping Guide for Homeowners

    Mulch vs Rock Landscaping Guide for Homeowners

    Mulch and rock can both finish landscape beds cleanly, but they do not behave the same over time. Homeowners often compare them as if the decision is purely visual, yet the better choice also depends on climate, maintenance tolerance, plant type, weed pressure, and how the bed connects to the rest of the yard.

    In many landscapes, the right answer is not one material everywhere. Some yards benefit from mulch around planting-heavy areas and rock in sections where a more durable, lower-disturbance finish makes sense.

    Why mulch works well in many planting beds

    Mulched planting bed around a home with shrubs and flowers showing organic coverage and finished edges.
    Mulch often works well where plant health, soil improvement, and a softer garden look matter most.

    Mulch is often favored because it looks natural, helps moderate soil temperature, and works well around many shrubs, perennials, and young plantings. It can also make a bed feel softer and more connected to the garden, especially when the design leans toward a planted, layered look.

    Mulch does need refreshing over time, which is part of the long-term maintenance picture. For homeowners building new beds, the planting installation guide helps frame where mulch often fits best.

    Why rock appeals to some homeowners

    Rock can offer a cleaner, more permanent-looking finish and may suit modern or low-water landscape styles. It usually does not break down the way mulch does, so some homeowners see it as a lower-renewal option. In dry-climate or architectural landscapes, that can be a strong aesthetic and practical match.

    The tradeoff is that rock can hold heat, shift over time, and still require weed management. It is not automatically maintenance-free just because it lasts longer as a material.

    Weeds, cleanup, and upkeep

    Both mulch and rock can have weed issues if the bed is not prepared well. Mulch may need periodic topping up and cleanup, while rock can collect debris and become harder to tidy once leaves and organic matter settle into it. What feels like “less work” depends a lot on the yard and the owner’s expectations.

    Homeowners focused on simpler upkeep should also compare the broader low-maintenance landscaping approach, because plant selection and irrigation often affect labor just as much as ground cover choice.

    Heat, plant health, and appearance

    Mulch usually supports a softer planted look and can be friendlier around certain root zones. Rock can visually sharpen a bed and may fit drought-tolerant schemes, but in hotter climates it can intensify reflected heat around some plants. That is why material should be chosen with plant palette and exposure in mind, not just color preference.

    Cost and long-term value

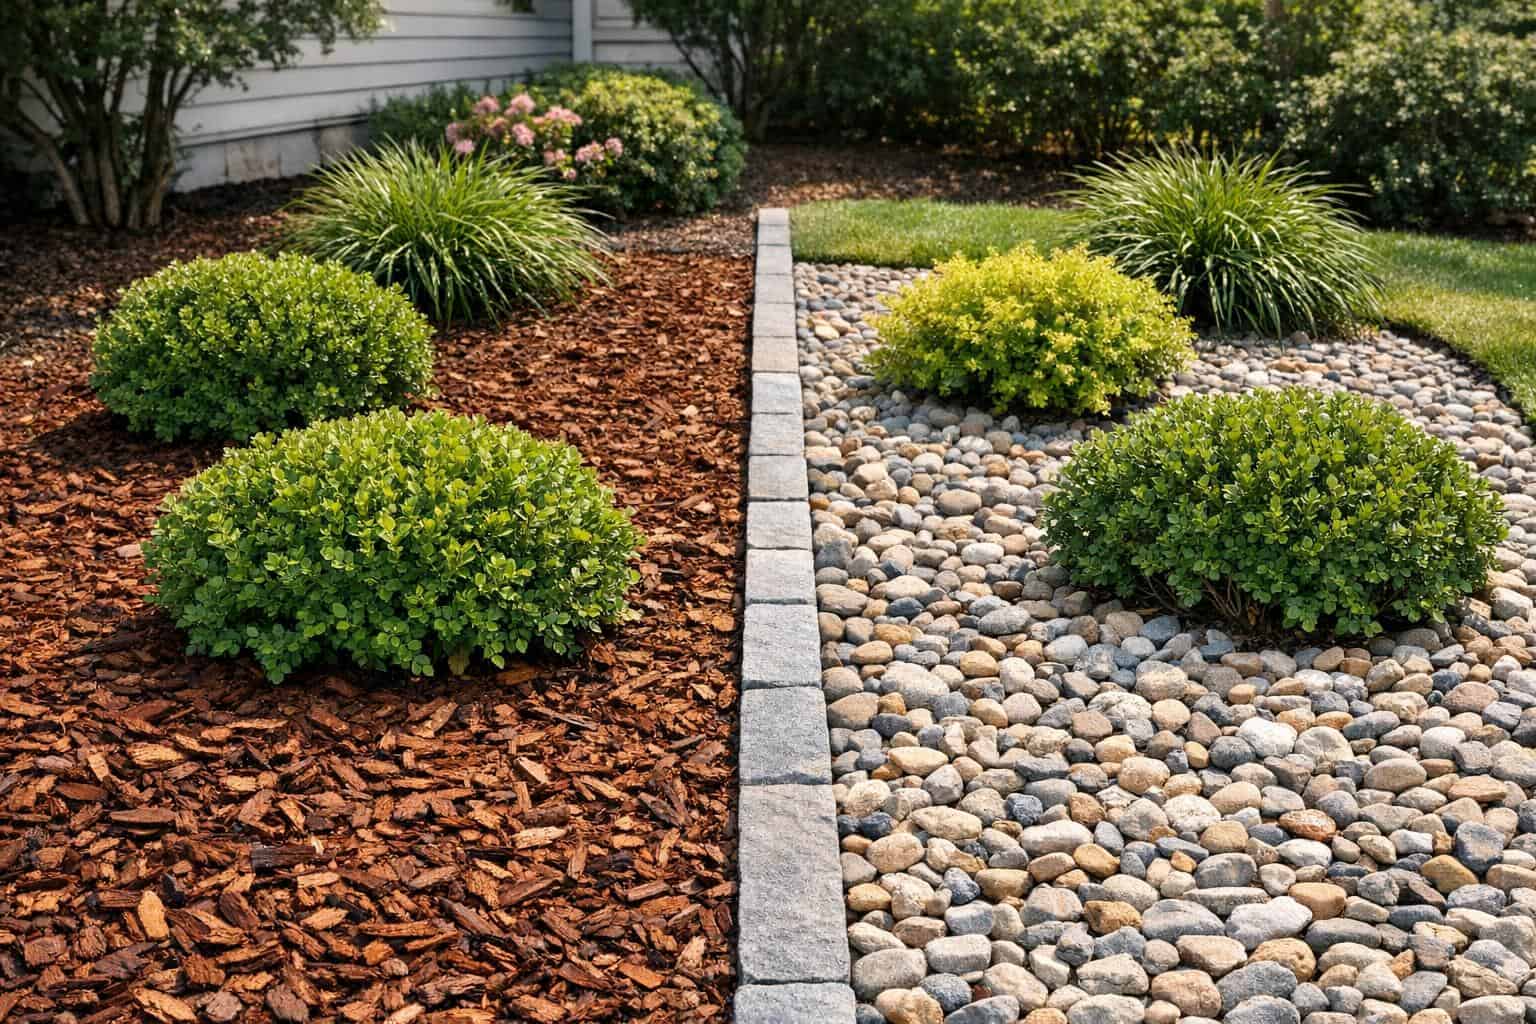
    Decorative rock and mulch materials compared in a residential landscape based on appearance and replacement needs.
    Mulch and rock have different long-term value once replacement cycles, cleanup, and plant performance are considered.

    Mulch may cost less upfront in some projects, while rock can cost more to supply and install depending on the material and depth. Over time, the cost picture shifts because mulch often needs replenishment and rock may need periodic cleanup or resetting. The best comparison is how each material performs in the exact part of the yard where you plan to use it.

    Homeowners who think about appearance, heat, maintenance, and plant health together usually make a better long-term choice than those who pick ground cover on looks alone.

    Buying guide: Homeowners trying to source bed and ground-cover products can use the Where to Buy Landscaping Materials Guide before pricing local suppliers.

    Lifespan guide: The ground-cover lifespan guide helps homeowners connect material choice to refresh timing and long-term upkeep.

    More Comparison and Decision Guides


  • Fire Pit Gas vs Wood Guide for Homeowners

    Fire Pit Gas vs Wood Guide for Homeowners

    Gas and wood fire pits can both create a strong backyard focal point, but they deliver very different day-to-day experiences. Some homeowners want instant ambiance with clean ignition and simple shutdown. Others care more about the sound, smell, and ritual of a real wood fire. The right choice depends on how the space will be used, how much maintenance you want, and how the fire feature fits into the larger yard plan.

    This is one of the best decisions to make before final design starts. Once the patio, seating layout, and utility path are planned around one type of fire feature, switching later can become more expensive and less convenient.

    Why homeowners choose gas fire pits

    Gas fire pits are popular because they are easy to use. Many can be turned on quickly, deliver steady flame with less smoke, and shut off with minimal cleanup. That convenience makes them attractive for homeowners who want to use the feature often, especially on patios close to the house or in entertaining spaces where people want a clean, predictable setup.

    Gas units often pair naturally with more polished outdoor-living builds. If the fire area is being planned alongside an outdoor kitchen or upgraded lighting, gas may fit the same low-friction design direction.

    Why homeowners choose wood fire pits

    Wood fire pits appeal to homeowners who want the traditional feel of a live fire. The smell, crackle, and stronger campfire atmosphere can be hard to replicate. In the right backyard, that experience can feel more casual, social, and memorable than a gas feature.

    The tradeoff is that wood typically means more smoke, more cleanup, more storage, and more attention during and after use. That is not necessarily a drawback for every household, but it should be an intentional choice rather than a surprise after installation.

    Convenience, cleanup, and maintenance

    Gas usually wins on convenience. There is no wood stack to maintain, no ash to remove, and less mess around the seating area. Wood requires more routine cleanup and may affect nearby cushions, surfaces, or planting if smoke exposure is frequent. For homeowners who want easier upkeep across the whole yard, the low-maintenance landscaping guide aligns more naturally with gas-style convenience.

    Fire Pit Gas vs Wood Guide for Homeowners related example showing Landscape beds and groundcover materials relevant to homeowner quantity planning for mulch, soil, and decorative rock
    This materials example gives homeowners a visual reference for comparing layout, materials, and maintenance tradeoffs before starting the project.

    Cost considerations

    The right cost comparison is not just the unit itself. Gas may require utility work, trenching, and coordination with licensed trades. Wood may avoid that infrastructure, but it can still involve material, construction, and ongoing fuel handling. If the fire pit is part of a larger project, it helps to compare complete scope in the broader landscaping costs guide.

    Safety and backyard fit

    Both options need smart placement, proper clearances, and good materials around the feature. Gas can feel easier to manage in tighter entertaining spaces. Wood may need more attention to smoke direction, nearby structures, and surface protection. Homeowners should also think about whether the surrounding patio, seating, and planting plan support the way the feature will actually be used.

    Fire Pit Gas vs Wood Guide for Homeowners related example showing Landscape beds and groundcover materials relevant to homeowner quantity planning for mulch, soil, and decorative rock
    This related materials detail helps show how site conditions and finish choices can change the homeowner's plan.

    For the full project-side view, the fire pit installation guide covers design and construction expectations in more detail.

    More Comparison and Decision Guides


  • Retaining Wall Block vs Poured Concrete Guide for Homeowners

    Retaining Wall Block vs Poured Concrete Guide for Homeowners

    Retaining wall block and poured concrete can both work well in residential landscapes, but they are not interchangeable in every situation. Homeowners often compare them based on appearance alone, yet the better choice also depends on drainage, wall height, site conditions, engineering requirements, and the look they want the yard to have over time.

    Understanding the difference between these systems early can make estimate comparisons much easier. One contractor may recommend segmental wall block because it fits the site, drains well, and offers a textured finished look. Another may recommend poured concrete for a cleaner modern style or for structural reasons. The right answer depends on the project, not just the material category.

    How segmental retaining wall block works

    Segmental retaining wall block used in a residential yard with structured grade change and landscaping.
    Segmental wall block often gives homeowners more flexibility in appearance, layout, and phased installation.

    Segmental retaining walls are built from interlocking or stacked concrete blocks installed over a prepared base with drainage considerations behind the wall. They are common in residential work because they come in many sizes and finishes, can look natural or contemporary, and often integrate well with planting and patio design. The modular system can make curves, steps, and terraced layouts easier to achieve.

    Block systems still require proper excavation, base prep, drainage stone, and the right construction method. Homeowners should not assume they are simple just because they are modular. The broader retaining wall guide explains the installation basics and when a wall may need engineering or permits.

    How poured concrete retaining walls differ

    Poured concrete walls usually create a smoother, more monolithic appearance. They are often chosen for modern aesthetics or for projects where the design calls for crisp lines and a continuous structural form. Depending on the wall, reinforcement and formwork may be part of the build, which can increase complexity and labor.

    Poured concrete can perform very well, but drainage and waterproofing detail still matter. A strong-looking wall can still fail if water pressure is allowed to build behind it. That is why retaining wall decisions often overlap with the drainage planning process.

    Appearance and design flexibility

    Segmental block tends to offer more visual texture and more finish options right out of the box. It can work in rustic, traditional, and many contemporary yards depending on the block style. It is also well suited to tiered gardens, curved beds, and blended planting zones.

    Poured concrete generally creates a cleaner and more minimal look. In the right design, that can feel architectural and upscale. But some homeowners find it too stark unless it is softened by planting, lighting, or surrounding hardscape. If appearance is the main driver, ask contractors to show examples of completed walls in yards similar to yours.

    Drainage and site performance

    Residential retaining wall installation with drainage planning and structured slope support behind the wall.
    Drainage planning matters just as much as wall material when the goal is long-term retaining wall performance.

    Drainage is one of the biggest practical differences homeowners should discuss. Segmental systems are often designed with drainage stone and can be more forgiving visually if small movement occurs over time. Poured concrete walls can be very durable, but poor drainage detailing behind the wall can create serious pressure issues.

    Retaining Wall Block vs Poured Concrete Guide for Homeowners related example showing Retaining wall detail relevant to planning mistakes, drainage, and grade behavior
    This retaining wall example gives homeowners a visual reference for comparing layout, materials, and maintenance tradeoffs before starting the project.

    If runoff or slope water is already a concern, it is worth reviewing the erosion control guide and the drainage vs regrading comparison before choosing a wall system in isolation.

    Cost and construction complexity

    Costs vary by wall height, access, drainage demands, engineering, finish choice, and labor conditions. Some block walls are very cost-effective for residential sites. Some poured concrete walls become expensive because of forming, reinforcement, and finish detail. Conversely, a highly detailed block wall with curves and terraces can also become a major project.

    The key is comparing complete scope, not just wall material. Ask whether the estimate includes excavation, export, drainage stone, backfill, engineering, geogrid if needed, permits, and final grading. That will give you a more useful comparison than material pricing alone.

    Which choice fits which kind of project

    Segmental block often makes sense for decorative-yet-functional garden walls, terracing, and residential slopes where homeowners want texture and design flexibility. Poured concrete may make more sense where the desired look is very clean and modern or where the design and engineering call for that system specifically. Neither choice is automatically better in every yard.

    • Choose block when you want texture, modular flexibility, and a system commonly used in residential garden and slope projects.
    • Choose poured concrete when the design requires a cleaner monolithic appearance or when a structural approach points in that direction.
    • In either case, make drainage, base preparation, and overall site design part of the conversation from the beginning.

    For most homeowners, the best decision comes from looking at the whole site: water, grade, wall purpose, and the surrounding yard design. A retaining wall should solve a problem and still feel like it belongs in the landscape.

    More Comparison and Decision Guides

    Estimate retaining wall cost by wall assumptions

    Use this calculator to test wall face area, material type, drainage complexity, and access before comparing block, concrete, and engineered wall scopes.

    Retaining Wall Cost Calculator

    Estimate retaining wall pricing with wall size, material type, drainage, and access assumptions.


  • Erosion Control Guide for Homeowners

    Erosion Control Guide for Homeowners

    Erosion is more than a cosmetic landscaping issue. When soil washes away, homeowners can lose planting beds, expose roots, undermine hardscape, create muddy runoff, and place stress on slopes or structures. In some yards, erosion appears slowly as thinning soil and exposed areas. In others, it shows up quickly after storms as rills, channels, washed mulch, or sediment collecting where it should not.

    The right fix depends on why the soil is moving in the first place. Water concentration, steep grade changes, poor vegetation cover, gutter discharge, bare soil, compacted surfaces, and neighboring runoff patterns can all contribute. That is why erosion control should be treated as a site problem first and a planting problem second.

    Signs a yard may need erosion control

    Homeowners often notice erosion after heavy rain, but the warning signs can appear well before that. Bare patches on a slope, exposed roots, washed-out mulch, sediment on walkways, low spots forming near runoff paths, and areas where water consistently carves channels through the soil are all common signals. If a retaining wall, fence, or patio edge is starting to look undermined, the issue may be more serious than surface damage.

    Erosion Control Guide for Homeowners related example showing Landscape beds and groundcover materials relevant to homeowner quantity planning for mulch, soil, and decorative rock
    This materials example gives homeowners a visual reference for comparing layout, materials, and maintenance tradeoffs before starting the project.

    When runoff is the main driver, the best starting point is often the broader drainage guide. If the yard has grade problems, the grading and yard leveling guide can help clarify whether reshaping the site should happen before adding stabilization materials.

    Common residential erosion causes

    In residential landscapes, erosion usually comes from concentrated water flow rather than one dramatic event. Downspouts may release too much water in one area. A patio or driveway may shed water toward a bed or slope. Soil may be left exposed after a project, with no planting or protective cover. In some cases, irrigation overspray contributes to surface loss over time. Steeper slopes and sparse root systems make these conditions worse.

    Yards with repeated runoff often need a combination of solutions, not a single fix. For example, a homeowner may need better drainage collection, regrading, denser planting, and mulch or rock coverage together. Treating only the visible damage without redirecting the water usually leads to repeat failure.

    Common erosion-control solutions

    Solutions vary based on slope, soil type, drainage pattern, and severity. Planting deep-rooted ground cover can help hold soil in place. Mulch blankets or erosion-control matting may stabilize exposed surfaces while vegetation establishes. In tougher areas, contractors may use rock swales, channel lining, edging, small retaining structures, or grade reshaping to slow and redirect runoff.

    Hardscape solutions are not always the first choice, but they can be necessary when the slope is steeper or when soil movement threatens surrounding structures. If wall construction is part of the plan, the retaining wall guide and the retaining wall material comparison can help frame the conversation.

    How planting supports erosion control

    Planting helps most when it is part of a broader stabilization strategy. Dense root systems protect the surface, reduce splash erosion, and improve soil structure over time. But planting alone may fail if water is still moving too fast across the site. Matching plant choice to exposure, moisture, and slope conditions is essential.

    For homeowners who want a softer-looking fix, combining stabilization with a planting installation plan can make the final result look intentional rather than purely functional.

    How much erosion-control work may cost

    Costs depend heavily on site access, slope severity, drainage corrections, and how much material is needed to stabilize the area. A simple planting-and-mulch fix is very different from a project that includes trench drainage, grade changes, rock work, or structural support. As with most yard work, the labor behind the fix often matters as much as the visible materials.

    Erosion Control Guide for Homeowners related example showing Landscape beds and groundcover materials relevant to homeowner quantity planning for mulch, soil, and decorative rock
    This related materials detail helps show how site conditions and finish choices can change the homeowner's plan.

    When comparing estimates, ask contractors which part of the work addresses the cause, which part protects the surface, and how long the stabilization may take to fully establish. That is especially important when vegetation is part of the solution.

    Questions to ask a contractor

    • What is causing the erosion on this site, and how are you addressing that cause directly?
    • Will the solution rely on planting, hardscape, drainage work, or a combination?
    • How will runoff behave differently after this work is complete?
    • What maintenance should be expected while the area establishes?
    • Are there sections of the yard that need grading before surface stabilization begins?

    Erosion control works best when it is treated as part of the whole landscape system. Homeowners who solve runoff, grade, and stabilization together usually get a cleaner-looking yard and a more durable result.

    Materials guide: Homeowners working on grade-sensitive sites can also use the sloped-yard materials guide before choosing surfaces and ground cover.

    Quote guide: The erosion control quote guide helps homeowners compare runoff diagnosis, stabilization methods, drainage measures, and slope-treatment scope.

    Timeline guide: The erosion control timeline guide helps homeowners compare diagnosis, stabilization work, planting, and follow-up expectations.

    Expectations guide: The erosion control expectations guide helps homeowners understand early site disruption, stabilization steps, and follow-up timing.

    Mistakes guide: The erosion control planning mistakes guide helps homeowners catch runoff-diagnosis and stabilization-strategy mistakes before work begins.

    Maintenance guide: The erosion control maintenance guide helps homeowners monitor runoff, slope condition, and stabilization performance over time.

    Warning signs guide: The erosion control warning signs guide helps homeowners judge renewed runoff, exposed soil, and slope movement before the problem worsens.

    More Service Planning Guides


  • Artificial Turf vs Natural Grass Guide for Homeowners

    Artificial Turf vs Natural Grass Guide for Homeowners

    Homeowners comparing artificial turf and natural grass are usually trying to solve a mix of issues at once: maintenance, water use, appearance, mud, patchiness, and how much time they want to spend caring for the yard. Both options can make sense, but they come with different tradeoffs in cost, feel, drainage behavior, and long-term expectations.

    This guide breaks that decision into practical homeowner terms.

    How artificial turf and natural grass differ

    • Artificial turf: reduces mowing and day-to-day lawn care, but has a higher installation cost and a more constructed feel.
    • Natural grass: offers a classic living surface and often a lower upfront installation cost, but needs irrigation, seasonal care, and ongoing maintenance.
    • Key tradeoff: turf can reduce routine work, while natural grass offers a softer living landscape experience if you are willing to maintain it.

    Upfront cost versus long-term upkeep

    Artificial turf usually costs more to install than sod or seed, especially when the base, drainage, edging, and finish details are handled properly. Natural grass often costs less upfront but carries recurring maintenance, irrigation, fertilization, and repair costs over time.

    Artificial Turf vs Natural Grass Guide for Homeowners related example showing Lawn detail relevant to thinning, irrigation stress, and warning signs
    This lawn example gives homeowners a visual reference for comparing layout, materials, and maintenance tradeoffs before starting the project.

    If you are also weighing lawn establishment, our sod and lawn installation guide is useful alongside this page.

    Drainage, heat, and feel underfoot

    These differences matter more than many homeowners expect. Artificial turf behaves differently with heat and surface feel, and its drainage depends heavily on the base and installation quality. Natural grass changes seasonally and can become muddy or patchy when drainage or irrigation is poor. That is why this decision often connects to broader water-management planning.

    Questions to ask before choosing

    • What is the real problem I am trying to solve: water use, maintenance, mud, durability, or appearance?
    • How much seasonal lawn care am I realistically willing to keep up with?
    • How will drainage be handled with this option?
    • How will the surface feel and look in the climate where I live?
    • What will long-term upkeep actually look like for this choice?

    What homeowners should remember

    The best choice is usually the one that matches how you actually want to live with the yard. Some properties benefit from real grass, some benefit from artificial turf, and some benefit from reducing lawn area altogether. If you want that broader perspective, read our low-maintenance landscaping guide too.

    Artificial Turf vs Natural Grass Guide for Homeowners related example showing Lawn detail relevant to planning mistakes, prep, and irrigation decisions
    This related lawn detail helps show how site conditions and finish choices can change the homeowner's plan.

    Service guide: The Artificial Turf Installation Guide explains how base prep, drainage, and edge detail shape the finished result.

    More Decision and Planning Guides