Professional paver installation usually costs about $10 to $25 per square foot for standard concrete pavers, and more for clay brick, natural stone, or permeable systems. A typical 12×16 paver patio often lands somewhere around $2,500 to $5,000, and a simple front walkway can cost as much per square foot as a patio because of all the cutting and edging.
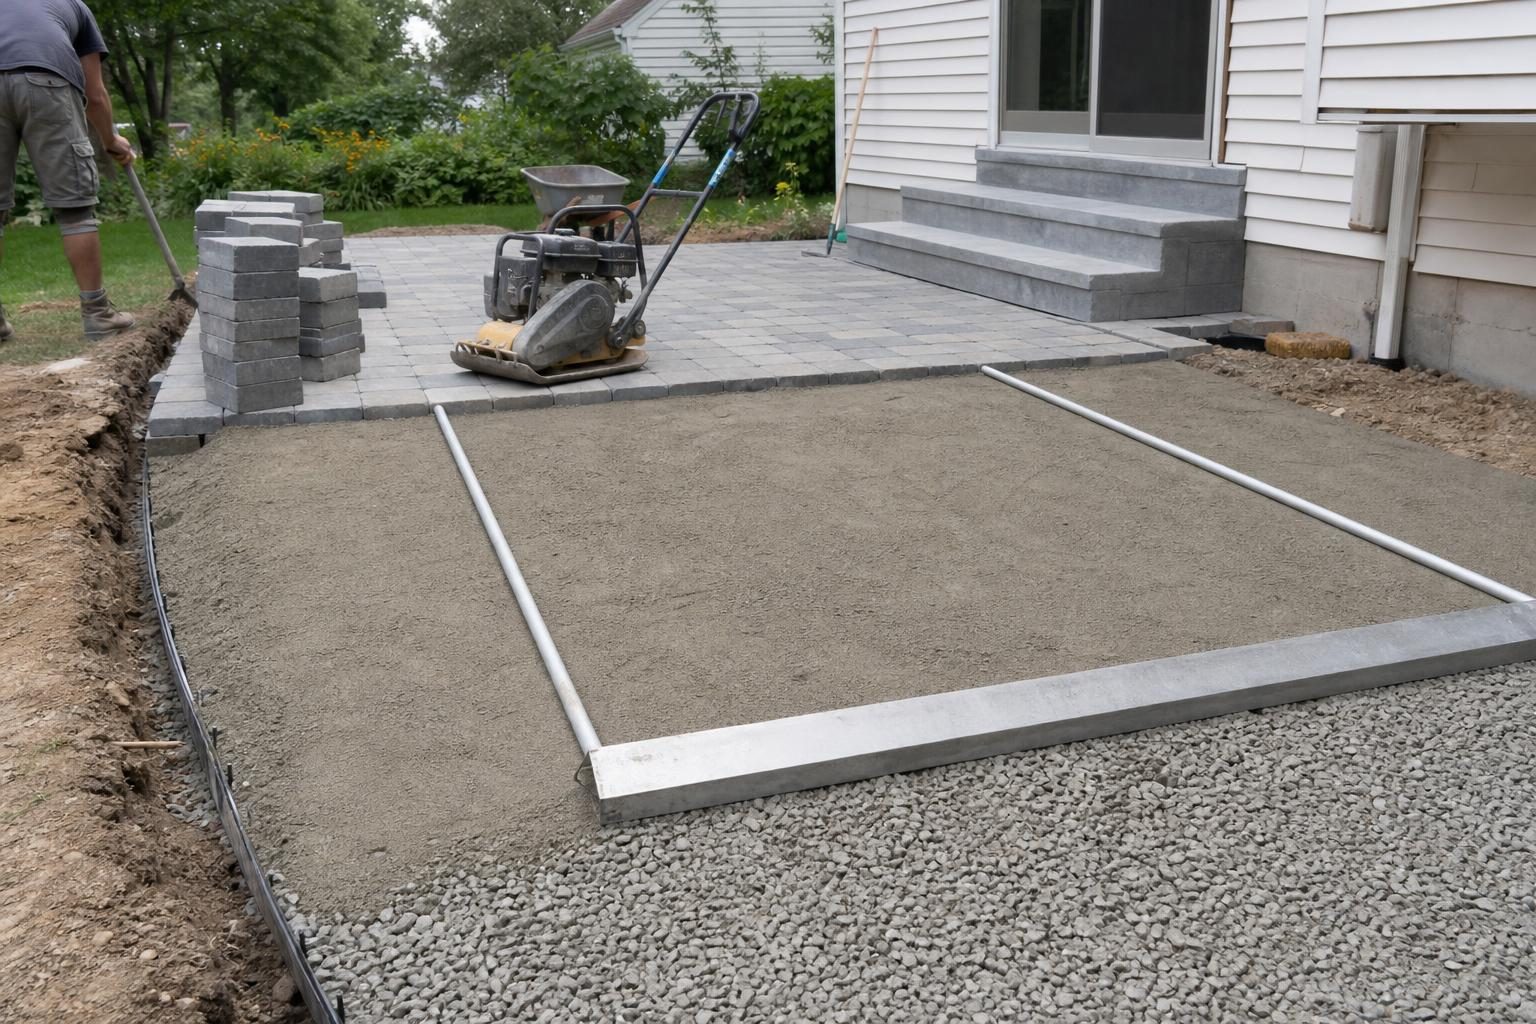
What you’re really paying for is the part you never see: the dig, the compacted base, and the edge restraint. This guide breaks down the price and the problems that follow when that hidden work gets skimped.
Quick answer: Budget roughly $10–$25 per sq ft installed for concrete pavers, $14–$30 for clay brick, $15–$40+ for natural stone, and $15–$35 for permeable pavers. Walkways often run $12–$30 per sq ft because they need more cuts and edging per square foot. The biggest quality differences hide below the surface: at least 4 inches of compacted gravel base for patios and walks (often 6–8 inches in clay or cold climates), about 1 inch of bedding sand, and a solid edge restraint. Ask for those details in writing.
Part of our Complete Patio and Paver Guide: materials, costs, installation, repair and hiring in one place.
Paver installation cost by paver type
Contractors price paver work per square foot, and labor, excavation, base stone, hauling, and edging usually outweigh the pavers themselves. The ranges below are rounded US installed prices (labor and materials) for a patio on a properly built base. They vary widely by region, soil, site access, and pattern, and big metro areas often sit at or above the top of each range.
| Paver type | Typical installed cost per sq ft | Good to know |
|---|---|---|
| Standard concrete pavers | $10–$25 | The most common choice; many shapes and colors; easy to find matching replacements later |
| Premium concrete pavers (textured, large-format, slab-style) | $15–$30 | Large slabs need a flatter base and more careful handling, which adds labor |
| Clay brick pavers | $14–$30 | Color is fired through, so it holds up well to fading; harder to cut |
| Natural stone (flagstone, bluestone, travertine) | $15–$40+ | Irregular stone takes more fitting time; dimensional cut stone is faster |
| Permeable pavers | $15–$35 | Needs a deeper open-graded stone base and different joint stone; can earn stormwater credits in some cities |
| Add-ons: tear-out, regrading, steps, seat walls | Priced separately | Removing an old slab or adding a step or wall can change the total more than the paver choice |
Pattern matters too. A simple running bond or stack pattern needs the fewest cuts. Herringbone, circles, and mixed-size patterns can add noticeable labor, and a contrasting border (often called a soldier course) adds both material and cutting time. If you’re still choosing a look, our guide on how to choose paver colors and finishes helps narrow it down before you ask for bids.

Patio and walkway cost examples
Per-square-foot prices drop as projects get bigger, and small jobs often hit a minimum charge. These are rough planning numbers for standard concrete pavers.
| Project | Approx. size | Typical installed range |
|---|---|---|
| Small patio or landing (10×10) | 100 sq ft | $1,500–$3,000 (minimums often apply) |
| Standard patio (12×16) | 192 sq ft | $2,500–$5,000 |
| Larger patio (20×20) | 400 sq ft | $4,500–$10,000 |
| Front walkway (4 ft x 30 ft) | 120 sq ft | $1,500–$3,600 |
| Curved garden path (3 ft x 40 ft) | 120 sq ft | $1,800–$4,000+ |
Paver walkways cost more per square foot because a narrow path has edges on both sides along its entire length. That means more edge restraint, more cuts, and more hand work per square foot than a square patio. Our walkway and pathway installation guide covers widths, slopes, and layout choices.
If you’re comparing materials, a plain broom-finish slab usually costs less up front. See our concrete patio cost guide for poured pricing, and the side-by-side comparisons of paver patio vs concrete patio and paver patio vs stamped concrete.
What’s in the price per square foot

Two quotes for the same patio can differ by thousands of dollars, and the gap is usually in the layers under the pavers. Here’s what a complete installation includes.
Excavation and hauling
The crew removes sod and soil deep enough for the base, bedding sand, and paver thickness. For a patio on 4–6 inches of base, that’s usually 7–9 inches of digging.
Compacted gravel base
This is the foundation. Industry construction guidance calls for at least 4 inches of compacted aggregate base under patios and walkways and at least 6 inches under residential driveways. Many experienced installers go deeper, often 6–8 inches for patios, on clay soil, poorly drained yards, or anywhere with hard freezes. The base should go in thin layers (lifts), each one compacted with a plate compactor before the next is added. One thick, lightly compacted layer is a common reason patios sink a few years later.
Bedding sand
A thin layer of coarse concrete sand, about 1 inch thick, is screeded flat on top of the base. The pavers sit in this layer. Sand much thicker than about an inch is not a fix for an uneven base. It’s a shortcut that tends to lead to dips and ruts.
Edge restraint
Pavers stay tight only when the outside edge can’t move. Common restraints are plastic or aluminum edging spiked into the base, or a concrete edge set below the surface. Without one, the outer rows creep outward, joints open up, and the whole surface loosens.
Laying, cutting, and borders
Laying the field goes fast. The cuts at edges, curves, and around posts or drains are what take time. A soldier-course border, inlays, or a herringbone pattern add cutting and material waste, often 5–15% extra pavers.
Compaction and joint sand
After laying, the surface is compacted again to seat the pavers into the bedding sand, and the joints are filled. Polymeric sand, which contains binders that firm up when wet, is common now because it resists washout and discourages ants.
Slope and drainage
A patio should fall away from the house, usually about 1/8 to 1/4 inch per foot, so water doesn’t sit on the surface or run toward your foundation. Downspouts that dump onto pavers should be piped away, because running water strips joint sand.
For a broader look at line items, our guide to what a hardscape estimate should include walks through scope, cleanup, and payment terms.
DIY vs hiring a pro

DIY can cut the cost roughly in half, since labor is the largest share. But paver patios are heavier work than most people expect. A 12×16 patio can mean moving around 4 tons of gravel, a ton of sand, and a few tons of pavers, plus digging and hauling out a similar amount of soil. DIYers often report that a project they planned for a weekend took four or five full days, with digging as the slowest part.
DIY tends to work well for:
- Small, square patios and straight paths on flat, well-drained ground
- Simple patterns with few cuts
- People willing to rent a plate compactor and a wet saw and follow base depths carefully
Hiring a pro usually makes sense for:
- Clay soil, slopes, steps, or anything that needs regrading or drainage work
- Large patios, complex patterns, curves, or natural stone
- Patios against the house, where slope and water management really matter
The most common DIY failure is rushing compaction, which leaves soft spots that become dips after the first wet season.
Problems homeowners run into
Across homeowner forums and contractor discussions, the same complaints keep coming up. Most trace back to the base, the edges, or water.
- Sinking and low spots. Owners describe pavers dipping near the house, along a retaining wall, or in a spot where water collects, sometimes within a year or two. Pros usually point to a base that was too thin or poorly compacted, soil that was never firmed up, or water washing material out underneath.
- Edges spreading and joints opening. When the edge restraint is missing, too light, or not spiked into the base, the outer pavers drift and gaps open across the patio.
- Weeds between pavers. Many people expect polymeric sand to stop weeds completely. It helps, but most weeds come from windblown seeds rooting in dirt and debris that settles on top of the joints. Regular sweeping and a refill when joints get low do more than landscape fabric under the base.
- Polymeric sand haze. A milky film on new pavers is a frequent complaint. It usually happens when fine polymer dust is left on the surface and then wetted, which glues it to the paver face. Blowing the surface completely clean and using a gentle shower setting, not a flood, prevents most of it. Removing haze afterward often takes a special cleaner.
- Joint sand washing out or crumbling. Sand that was not filled deep enough, not vibrated in, or installed before rain may need topping up after the first winter. Pressure washing too close to the joints strips sand too.
- White blotches (efflorescence). A white chalky haze can show up on new concrete pavers. The paver industry describes it as a natural, harmless salt deposit that is not fading, and it usually goes away on its own over weeks to months. Darker pavers show it more. Use cleaners made for pavers if you clean it at all.
- Ants. Ants can mine bedding sand from underneath, which leads to small sunken areas. Polymeric joint sand and a proper base reduce the problem.
The Concrete Masonry & Hardscapes Association’s homeowner guide to pavers vs concrete makes the important flip side of these problems clear: because pavers are separate units, a sunken area can be lifted, the base corrected, and the same pavers reset, without a visible patch. If your existing patio is already in trouble, our guide to signs it is time to replace a patio helps you decide between repair and replacement.
Quote comparison checklist

Check each bid for these items. A cheap quote that leaves several vague is not really cheaper.
- Total square footage and a sketch or layout with the pattern and border marked.
- Excavation depth and whether soil hauling and disposal are included.
- Base material and compacted depth (for example, “6 in. compacted crushed stone, placed in lifts”).
- Bedding layer type and thickness (about 1 inch of concrete sand is typical).
- Paver product: manufacturer, line, color, and thickness.
- Edge restraint type on every exposed edge.
- Joint material (polymeric sand, jointing sand, or permeable stone) and who handles cleanup.
- Slope and drainage plan, including downspouts and any drains.
- Tear-out, regrading, steps, or tie-ins priced as separate lines.
- Warranty terms in writing, plus permit responsibility if your town requires one.
If you’re still deciding who to call, our guide on how to choose a paving company for a driveway or patio covers where to find installers and how to check their work. Planning shade over the new patio too? See our pergola and patio cover cost guide so footings can be planned before the pavers go down.
Questions to ask, red flags, and warranty
Questions to ask a contractor
- How deep will you dig, and how thick will the compacted base be on my soil?
- Will you compact the base in layers, and with what equipment?
- What edge restraint will you use, and how is it anchored?
- How will the patio slope, and where will the water go?
- Is anyone on the crew certified through the industry’s Concrete Paver Installer certification program?
- Can I see a patio you built at least three to five years ago?
- What does your workmanship warranty cover, for how long, and how do I make a claim?
Red flags
- A price with no base depth, or “2 inches of base” for a patio
- Pavers laid on thick sand or straight on soil to save digging
- No mention of edge restraint
- Pressure to decide on the spot, or a large cash deposit before materials are ordered
- No written warranty, or a warranty that excludes settling
What warranty to expect
There are usually two separate warranties. Paver manufacturers often offer long product warranties covering the pavers themselves, sometimes described as lifetime, but they generally exclude installation problems and may exclude damage from deicing salts. The installer’s workmanship warranty is what covers settling, shifting, and edge failure. Get it in writing. Obvious sinking in the first year or two should be a warranty call.
Frequently asked questions
How much does it cost to install pavers per square foot?
For standard concrete pavers, most homeowners see about $10–$25 per square foot installed, with clay brick, natural stone, and permeable systems costing more. Small jobs, walkways, complex patterns, and difficult access push the price toward the top of the range or above it.
Is a paver patio more expensive than concrete?
Usually, yes, up front. Plain poured concrete often costs less per square foot. Pavers tend to cost more to install but are easier to repair without visible patches, and they don’t rely on control joints to manage cracking.
How long does paver installation take?
A professional crew typically installs a standard 200–400 square foot patio in about two to five working days, depending on excavation, base depth, pattern, and weather. You can usually walk on it right away, but polymeric sand needs dry weather and a day or so to set.
Do pavers need to be sealed?
Sealing is optional. It can deepen color, help with stains, and lock joint sand, but it needs to be reapplied every few years and won’t fix a weak base. Many owners skip it on patios and walkways.
How long do paver patios last?
Quality concrete or clay pavers on a well-built base can last for decades. The pavers themselves rarely fail. What wears out is the joint sand and, if the base was poorly built, the flatness of the surface.
Is permeable paver installation worth the extra cost?
It can be if you have drainage problems, limits on impervious surface, or a city that offers stormwater fee credits. Permeable systems need a deeper base of clean stone and periodic joint cleaning. Our paver driveway guide covers permeable pavers and stormwater credits in more detail.