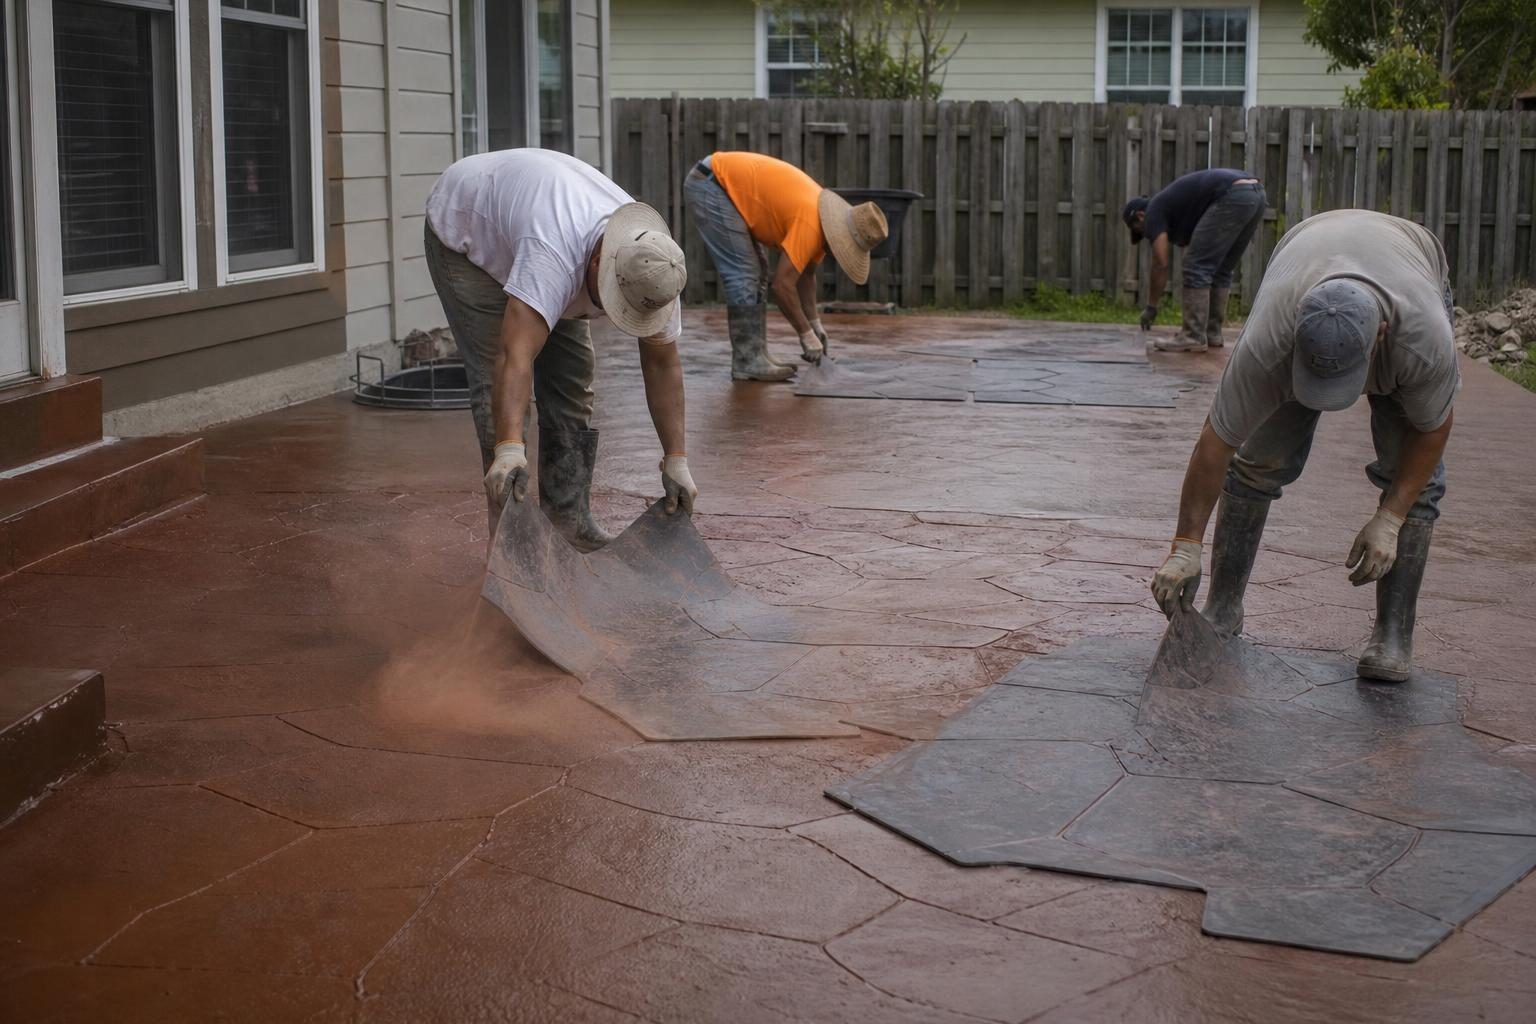
A stamped concrete patio is a poured slab that’s colored and pressed with texture mats while it’s still soft, so it looks like slate, flagstone, brick, or wood. Expect to pay roughly $10 to $18 per square foot for a single pattern and color, and $18 to $25 or more for borders, multiple colors, and hand detailing.
It can look great and costs less than many natural stone options. But it isn’t maintenance-free. Owners who are happy with it years later usually picked a skilled installer, chose their color wisely, and kept up with resealing. Owners who regret it usually missed one of those three.
Quick answer: Stamped concrete typically costs $10–$18 per square foot installed (about $1,900–$3,500 for a typical 12×16 patio), more for complex designs. It’s cheaper than many paver and stone patios, but plan to reseal every 2–5 years, expect some cracking and color wear over time, and know that repairs rarely match. Choose an installer who can show you jobs that are at least five years old.
Part of our Complete Patio and Paver Guide: materials, costs, installation, repair and hiring in one place.

How stamping works
Stamped concrete starts like any other patio: excavation, a compacted gravel base, forms, and a poured slab. The difference is what happens in the next few hours.
- Color goes in. Color can be mixed into the whole load (integral color), broadcast onto the wet surface as a color hardener and troweled in, or both. Integral color means a chip won’t reveal gray underneath. A color hardener gives a richer, harder surface.
- Release is applied. A powder or liquid release keeps the mats from sticking. Tinted release also settles into the low spots and becomes the darker “grout” or antiqued accent color.
- Mats are pressed in. When the concrete is firm enough to hold a pattern but still soft enough to take it, the crew lays texture mats in sequence and tamps them in. Edges and corners are detailed by hand. The working window is short, which is why crew size and experience matter so much.
- Joints are cut. Good installers cut control joints along the pattern’s grout lines so they blend in.
- Cure, wash, and seal. After curing, excess release is washed off and the surface is sealed to lock in color and resist stains.

Patterns and colors
The most common patterns are:
- Ashlar slate: rectangular and square “stones” in a cut-stone layout. Classic and forgiving.
- Random stone or flagstone: irregular shapes for a more natural look.
- Seamless textures: stone texture without grout lines. They look subtle and are easier to stamp cleanly.
- Brick and herringbone: a good border option; as a full field it can look busy.
- Wood plank: a deck look without boards to replace.
A few practical tips from people who live with it: very deep textures make tables and chairs wobble and trap dirt, so a moderate texture is easier to live with. Earth tones close to your home’s stone or trim tend to age better than bold colors. Light colors stay cooler underfoot in hot sun. Ask to see a real color sample poured on a board, not just a brochure chip. For more help choosing tones, our guide on choosing patio colors and finishes applies here too.
Stamped concrete cost
Prices are rounded US installed ranges. They vary by region, access, site prep, and design complexity.
| Design level | Typical cost per sq ft | 12×16 patio (192 sq ft) | 20×20 patio (400 sq ft) |
|---|---|---|---|
| Single pattern, one color | $10–$14 | $1,900–$2,700 | $4,000–$5,600 |
| Pattern plus contrasting border or release color | $13–$18 | $2,500–$3,500 | $5,200–$7,200 |
| Multiple patterns or colors, hand-tooled detail | $18–$25+ | $3,500–$4,800+ | $7,200–$10,000+ |
| Professional reseal (every few years) | About $1–$3 | $200–$600 | $400–$1,200 |
For comparison, a plain broom-finish slab of the same size usually runs about half as much or less. That gap is the price of the look. Our concrete patio cost guide breaks down plain, colored, and exposed aggregate pricing. Removal of an old patio, regrading, steps, and pumping concrete to a hard-to-reach backyard all come on top.
Stamped concrete vs pavers
| Question | Stamped concrete | Pavers |
|---|---|---|
| Upfront cost | Often a bit lower, though basic pavers can come in close | Often higher, especially natural stone |
| Repairs | Hard to make invisible; patches rarely match color or texture | Lift and reset or replace individual units |
| Cracking | Will crack somewhere; joints help hide it | Joints between units absorb movement |
| Color over time | Can fade, especially surface color in strong sun | Color runs through the unit; some fading over many years |
| Slip resistance | Can be slick when sealed with gloss and wet, unless grit is added | Generally good texture; varies by product |
| Ongoing upkeep | Reseal every 2–5 years | Occasional joint sand top-up, weed control, optional sealing |

Neither is right for every yard. Stamped concrete makes sense when you want a seamless decorative look at a moderate price and you’re willing to reseal. Pavers make sense when repairability matters most, for example over soil that moves or where you may dig for utilities later. We compare them in depth in paver patio vs stamped concrete patio.
Common regrets homeowners report
Across homeowner forums and reviews, the same complaints come up again and again. None of them are guaranteed, but all of them are worth planning around.
- The resealing never ends. The most common complaint is underestimating upkeep. Many owners reseal every two to three years to keep the color rich.
- Color faded faster than expected. Patios in full sun, especially those colored only on the surface, can look washed out within several years. Owners with integral color mixed through the slab tend to be happier.
- It’s slippery. A glossy “wet look” sealer can make the patio slick in rain, and dangerous around pools or on steps. Icy stamped surfaces are a common winter complaint.
- Repairs stick out. A cracked section, a utility cut, or a replaced walkway rarely matches the original pattern and color.
- Cold-climate wear. In freeze-thaw areas, some owners see pitting or flaking after a few hard winters, often worse where salt was used.
- Visible workmanship flaws. Mat edges, double impressions, smeared corners, and blotchy color are installation problems that are permanent once the slab sets.
- Resealing gone wrong. Putting the wrong sealer over an old one, or applying it too thick, can leave a cloudy or peeling finish. Darker border colors can also bleed onto lighter areas if the reseal isn’t done carefully.
- Taste changed. A few owners find a heavy pattern feels dated after some years and wish they’d gone simpler.

Stamped concrete driveways
Stamped concrete driveways get the same look but face harsher treatment: tires, oil drips, snow shovels, and de-icing salt. Expect the stamped premium over a plain driveway to be similar to a patio’s, and plan on more frequent resealing. A few extra cautions apply:
- Avoid rock salt. Chloride de-icers are one of the main causes of surface scaling, along with low air entrainment, overworked surfaces, and poor curing, as Euclid Chemical explains. Stamping involves a lot of surface work, so an air-entrained mix and a crew that doesn’t overwork the surface matter even more in cold climates.
- Snow removal. Use plastic shovel blades and skid shoes on snowblowers to avoid chipping the texture.
- Keep the pattern subtle. Shallow textures handle tires and shovels better than deep ones.
Our article on broom finish vs stamped concrete driveways goes deeper on the trade-offs.
How to pick an installer
Stamping is a specialty. A contractor who pours great plain slabs may not stamp well, and stamping mistakes can’t be undone after the concrete hardens. Use this checklist:
- Ask to see jobs that are five or more years old. New patios all look good. Older ones show how the color, sealer, and joints held up. Drive by an address or two if you can.
- Look closely at the details. Edges and corners should be fully textured, with no visible mat lines or repeated impressions, and joints should follow grout lines.
- Get the color in writing. The contract should name the color method, color names, release color, pattern, and sealer, so there’s no argument later.
- Ask about crew size on pour day. Stamping a large patio needs enough hands to finish before the concrete sets.
- Ask about sealer and maintenance. Which sealer, what sheen, will they add slip-resistant grit, and do they offer resealing later?
- Compare full scopes. Base depth, thickness, slope, joint plan, cleanup, and warranty should be on every quote. Our guide on how to compare landscaping quotes shows how.
Questions to ask a contractor
- Is the color integral, a color hardener, or both? Why?
- Where will control joints go, and how will you hide them in the pattern?
- Is the mix air-entrained? (Important in freeze-thaw climates.)
- What sealer will you use, and how soon after the pour will you apply it?
- What does your warranty cover: cracking beyond joints, flaking, color, sealer failure?
Red flags
- No photos of older work, or only photos taken the day the job was finished.
- Vague color descriptions like “tan” with no product or sample.
- A small crew planning to stamp a large area alone.
- No joint plan, or a promise that stamped concrete “won’t crack.”
- A high-gloss sealer around a pool with no mention of grit.
For general vetting steps, licensing, and insurance, see our concrete contractor guide.

Maintenance and resealing
The Concrete Network’s sealing guide suggests resealing stamped concrete about every 2 to 5 years, more often in harsh climates or heavy traffic. A simple check: if water beads up, the sealer is still working. If water soaks in and darkens the surface, it’s time.
- Clean first. Sweep and wash once or twice a year. Use a pressure washer gently so you don’t etch the surface.
- Match the sealer. Reapply the same type that’s already on the patio. Switching from a solvent-based acrylic to a water-based product without stripping can cause poor bonding.
- Go thin. Two thin coats beat one heavy coat. Thick sealer can trap moisture and turn cloudy or peel.
- Add grit where people walk wet. A slip-resistant additive in the sealer helps around pools, steps, and shaded areas.
- Skip the rock salt. Use sand for traction in winter.
Cracks are part of owning any concrete. Joints follow the NRMCA’s Concrete in Practice rule of thumb: spacing about 24 to 36 times the slab thickness, so roughly 8 to 10 feet for a 4-inch patio. For general upkeep habits, our concrete maintenance and sealing guide applies to patios too.
Frequently asked questions
Is stamped concrete cheaper than pavers?
Often, but not always. A simple stamped pattern usually costs less than most pavers. Multi-color stamped designs can cost as much as or more than basic concrete pavers.
How long does a stamped concrete patio last?
The slab itself can last decades on a good base. The look depends on upkeep: resealing every few years keeps color and texture from wearing.
Is stamped concrete slippery?
It can be when it’s wet and sealed with a glossy finish. Ask for a slip-resistant additive in the sealer and consider a satin or matte sheen.
Can you stamp an existing concrete patio?
Not the slab itself. Stamping only works on fresh concrete. A stamped overlay, which is a thin decorative layer applied over a sound existing slab, can give a similar look if the old patio is level and not badly cracked.
Can stamped concrete be repaired?
Cracks can be filled, and color can be touched up with stains or tinted sealer, but repairs are rarely invisible. That’s the biggest trade-off compared with pavers.
Can I reseal stamped concrete myself?
Many homeowners do, using the same type of sealer and thin, even coats on a clean, dry surface. If the old sealer is cloudy or peeling, a pro may need to strip it first.