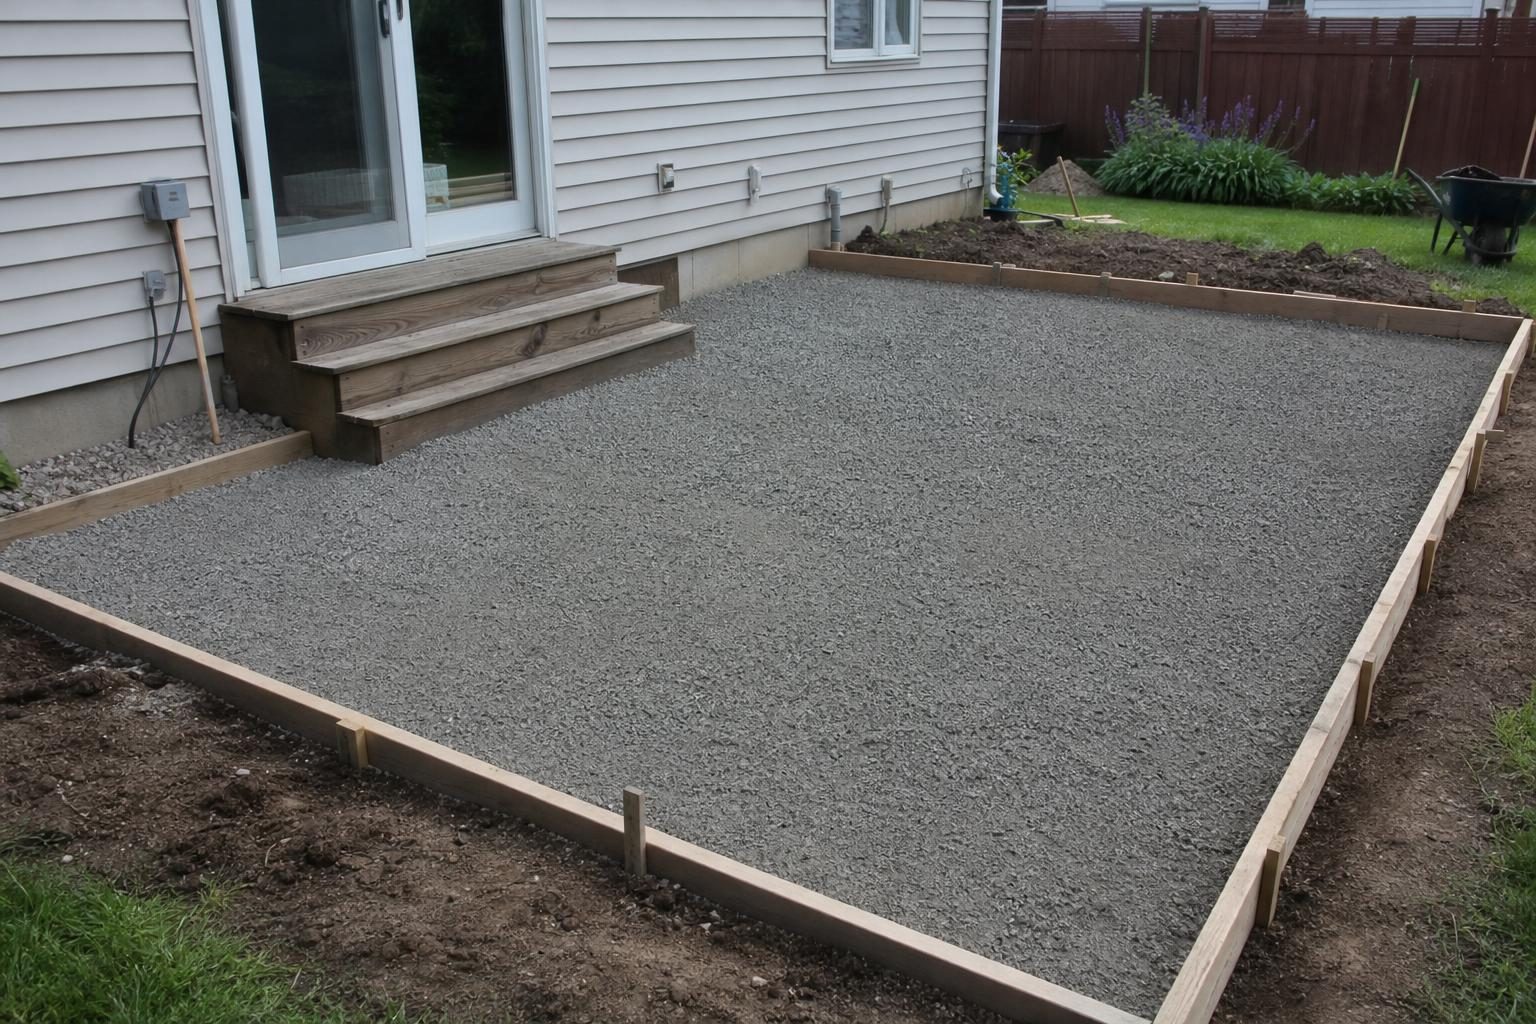
A poured concrete patio usually costs about $6 to $12 per square foot installed for a plain broom finish, and $10 to $20 or more for colored, exposed aggregate, or stamped work. For a common 12×16 patio, that puts most homeowners somewhere between about $1,200 and $4,000, depending on finish, site prep, and where you live.
The price per square foot is only half the story. Base prep, slope, joint layout, and curing decide whether that slab stays flat and crack-controlled for decades or starts tilting toward your back door in a few winters. This guide covers both: what you should expect to pay and what you should expect to get for it.
Quick answer: Budget roughly $6–$12 per square foot for a plain 4-inch broom-finish concrete patio and $10–$20+ for decorative finishes. A 10×10 often lands near $1,000–$2,000 because of minimum charges, a 12×16 around $1,200–$2,400 plain, and a 20×20 around $2,400–$4,800 plain. Pay attention to the gravel base, slope away from the house, and control joints every 8–10 feet. Those matter more than the finish.
Part of our Complete Patio and Paver Guide: materials, costs, installation, repair and hiring in one place.
Concrete patio cost by finish
Most contractors price patios per square foot, with the finish being the biggest variable after site conditions. The ranges below are rounded US installed prices (labor and materials) for a standard 4-inch slab on a prepared base. They vary a lot by region, access, and how much digging the site needs.
| Finish | Typical installed cost per sq ft | What you get |
|---|---|---|
| Broom finish (plain gray) | $6–$12 | Light texture for grip; the most affordable and the easiest to repair or match later |
| Exposed aggregate | $8–$15 | Top layer washed off to reveal stones; very grippy and hides dirt well |
| Integral color | $8–$14 | Pigment mixed through the whole slab, so chips don’t show gray underneath |
| Stamped (one color, one pattern) | $10–$18 | Pressed texture that imitates stone, slate, brick, or wood |
| Stamped with borders or multiple colors | $15–$25+ | More labor, more colors, more hand detailing |
| Extras: old patio removal, regrading, pumping | Often $1–$5+ added | Depends on what’s there now and how hard the site is to reach |
Trade references rank the finishes in the same order. The Concrete Network’s patio cost breakdown lists broom finish as the cheapest, then exposed aggregate and stained, with stamped at the top, and it notes that price per square foot usually falls as the patio gets bigger. If you’re leaning decorative, our guide to the stamped concrete patio covers patterns, upkeep, and the regrets owners report.
Cost examples by patio size
These totals assume a reasonably flat, accessible yard and a new 4-inch slab. Small patios cost more per square foot because many contractors have a minimum charge to cover mobilization, forming, and a concrete truck.

| Patio size | Area | Broom finish | Stamped or decorative |
|---|---|---|---|
| 10 x 10 | 100 sq ft | $1,000–$2,000 | $1,500–$2,800 |
| 12 x 16 | 192 sq ft | $1,200–$2,400 | $1,900–$4,000 |
| 16 x 20 | 320 sq ft | $1,900–$3,900 | $3,200–$6,500 |
| 20 x 20 | 400 sq ft | $2,400–$4,800 | $4,000–$8,500 |
Expect real quotes to spread out. It’s common for three bids on the same patio to differ by 50% or more, often because one includes excavation, a thicker base, or removal that another left out. That’s why comparing line items matters more than comparing totals. Our checklist on what a hardscape estimate should include helps you line bids up side by side.

What pushes the price up or down
- Access. If a truck can back up near the forms, the job is fast. If concrete has to be wheelbarrowed through a side gate or pumped over the house, add labor or a pump fee.
- Demolition. Breaking out and hauling an old patio, pavers, or deck footings adds cost and time.
- Grading and soil. Removing topsoil, roots, and soft spots and replacing them with compacted gravel is real work, especially on a slope.
- Shape. Curves, steps, and multiple levels take more forming and finishing than a rectangle.
- Thickness and reinforcement. Going from 4 to 5 or 6 inches, or adding rebar, raises material cost but may be worth it under a hot tub or in poor soil.
- Region and season. Labor rates vary widely, and busy spring schedules can firm up prices.
For the broader picture, including how patio materials compare, see what affects patio cost.
Base, thickness, and slope: the parts you can’t see
Once the concrete is poured, the base and slope are locked in. That’s why this is the most important section to check before the truck arrives.
Base
Topsoil, sod, and roots should be dug out, the subgrade compacted, and a layer of crushed gravel (commonly about 4 inches) placed and compacted in lifts. Soft or organic soil left under a slab is a common cause of settling and cracking. In cold climates or clay soils, your contractor may recommend a deeper base.
Thickness
Four inches is the usual thickness for a patio that carries people, furniture, and a grill. Ask about 5 to 6 inches, plus reinforcement, for a hot tub, an outdoor kitchen, or any spot where a vehicle or skid steer might cross.
Slope away from the house
A patio should fall away from the house so rain doesn’t collect at your foundation or slide under the door. A common target is 1/8 to 1/4 inch of drop per foot, which means the far edge of a 12-foot-deep patio sits roughly 1.5 to 3 inches lower than the edge by the house. The gentler end of that range feels flat enough for tables and chairs. Too little slope leaves puddles. Too much makes chairs feel tilted. If your yard already sends water toward the house, sort that out first. Our drainage solutions guide explains the options.
Cracking, control joints, and sealing

Every concrete patio will crack somewhere. Concrete shrinks as it cures and dries, and that shrinkage has to go somewhere. Control joints are grooves cut or tooled into the slab to tell the cracks where to go, so they hide inside straight lines instead of wandering across the middle.
The National Ready Mixed Concrete Association’s Concrete in Practice guidance on joints recommends joint spacing of about 24 to 36 times the slab thickness, which works out to roughly 8 to 10 feet for a 4-inch patio. It also recommends keeping panels close to square (length no more than 1.5 times the width), avoiding L-shaped panels, and cutting joints at least a quarter of the slab’s depth. Saw cuts should be made within hours of finishing, not days later. It also notes that wire mesh doesn’t prevent cracks; it only helps hold them tight.
Where the patio meets the house, steps, or a walkway, an isolation joint (a strip of compressible material) lets each piece move on its own. For more on why cracks happen and what’s normal, see why concrete cracks and how contractors control it. The same rules apply to patios.
Should you seal it?
A sealed concrete patio resists stains from grease, leaves, and rust, and holds up better against freeze-thaw and salt. Plain broom-finish patios are often sealed with a penetrating sealer that doesn’t change the look. Decorative and colored patios usually get a film-forming acrylic that deepens color but needs redoing every few years and can get slick when wet. In freezing climates, avoid rock salt and other chloride de-icers on new concrete, especially the first winter. Concrete admixture maker Euclid Chemical explains that heavy de-icer use, weak curing, and overworked surfaces are among the main causes of surface scaling.
Extending an existing patio
Adding onto a patio is a popular way to save money. Go in knowing three things:
- The colors won’t match. New concrete is lighter and different in tone from a slab that’s weathered for years. Many homeowners plan a deliberate separation instead, such as a border band, a strip of pavers, or a different finish, so the difference looks intentional.
- The new slab needs to be tied in or isolated. Contractors commonly drill and epoxy short rebar dowels into the old slab so the two sections stay level, or they use an isolation joint and accept independent movement. Ask which approach they’ll use and why.
- The old slab has to be worth keeping. If it’s already sunken, sloped toward the house, or badly cracked, extending it just ties new money to an old problem. Our guide on signs it’s time to replace a patio can help you decide.
Permits and project timeline

Permits
Rules vary by city. Many towns let you pour an at-grade patio without a building permit, while others require one above a certain size, near property lines, or when it counts against impervious-surface or lot-coverage limits. HOAs often need to approve plans too. Call your building department before you sign anything, and read do you need a permit for landscaping projects for the questions to ask.
Typical timeline
- Quotes and scheduling: one to several weeks, longer in spring.
- Excavation, base, and forms: usually one day for a typical patio, two if demolition or grading is involved.
- Pour and finish: one day; joints are tooled or saw-cut the same day.
- Curing: light foot traffic after a day or two, furniture after about a week, full strength in about a month. Keep the slab damp or covered with a curing compound during the first days, especially in hot, dry, or windy weather.
- Sealing (if planned): after the slab has cured. Ask your installer and the sealer label for timing.
Problems homeowners run into
Homeowners who’ve lived with a concrete patio for a few years tend to mention the same handful of issues:
- A patio that slopes toward the house. Water pools at the door or runs toward the foundation. Fixes are disruptive: breaking out a strip and adding a drain, or replacing the slab. An overlay can’t easily reverse slope without getting thick and needing reinforcement.
- Too little slope. A slab that’s nearly flat holds puddles after light rain and grows algae in shady spots.
- Random cracks across panels. Usually traced to joints spaced too far apart, cut too late or too shallow, or skipped entirely on steps and narrow pieces.
- Settling near the house. Loose backfill along a foundation settles over time. A slab poured on it can tip toward the wall.
- Surface flaking in winter. Scaling shows up when salt hits young concrete or when a wet, overworked surface was weak to begin with.
- Bid shock. Small patios come in higher per square foot than expected because of minimum charges, and decorative finishes can double the price of the same slab.

Concrete vs pavers
A plain poured concrete patio is usually the cheapest hard surface per square foot. Pavers usually cost more up front, but they’re easier to repair (lift and reset a few units) and don’t have one big slab to crack. Stamped concrete often lands in the same price range as basic pavers. Our full side-by-side, paver patio vs concrete patio, walks through cost, repairs, and lifespan.
Questions to ask a contractor
- How deep will you excavate, and how much compacted gravel goes under the slab?
- What thickness, and is there any reinforcement? Why or why not for my yard?
- How much slope will the patio have, and which direction does water go once it leaves the slab?
- Where will the control joints go, and will they be tooled or saw-cut? When will saw cuts happen?
- Is removal, haul-off, grading, and a pump (if needed) included in the price?
- Will you use an air-entrained mix? (In freeze-thaw areas this matters.)
- How will you cure the concrete, and what should I avoid in the first month?
- Who pulls the permit if one is needed? What’s your warranty on settling or workmanship?
Red flags
- A quote with only a total and no thickness, base depth, or joint plan.
- Plans to pour directly on sod or topsoil “because it’s only a patio.”
- No mention of slope, or a shrug when you ask which way water will run.
- Adding a lot of water to the truck on site to make the concrete easier to spread.
- Large upfront cash deposits or pressure to sign the same day.
Our concrete contractor guide covers licensing, insurance, and how to check past work.
Frequently asked questions
Is a concrete patio cheaper than pavers?
Usually, yes, for a plain broom finish. Once you add stamping and color, concrete often lands close to the cost of basic pavers.
How long does a concrete patio last?
A well-built patio on a good base commonly lasts 25 years or more. Poor base prep, bad slope, and salt damage are what cut that short.
How thick should a concrete patio be?
Four inches is standard for foot traffic and furniture. Go thicker and add reinforcement for hot tubs, outdoor kitchens, or poor soil.
Can I pour a concrete patio myself?
Small, simple slabs are doable for experienced DIYers with helpers. Concrete sets on its own schedule, though, and a 12×16 patio needs a crew ready to place, screed, float, and finish quickly. Mistakes are permanent.
Will my new patio crack even if it’s done right?
Probably, a little. The goal is for cracks to stay inside the control joints. Hairline cracks elsewhere are usually cosmetic. Wide, growing, or uneven cracks deserve a call to the installer.
When can I put furniture on a new patio?
Light foot traffic is usually fine after a day or two. Wait about a week for furniture and a grill, and longer for anything very heavy.